Project 102-3
Right Angle Weave Bracelet
Materials Needed
- Cultured Freshwater Pearls rice shaped 5mm Antiqued gold F14-3136CK
- Delica round rainbow-lined seed beads cranberry size 11 F14-DB0296V
- Nymo Beading thread, size 00 Brown F14-1957BS
- Size 10 Beading needles F14-1025BS
- Slide Clasp sterling silver, slide hook, three loops F14-8738FN
- Embellishment beads Chrysanthemum Stone round 6mm (2strands) F14-5969GS
- Bead Board grey three strand F14-1014BS
- Scissors
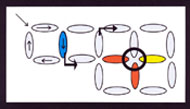
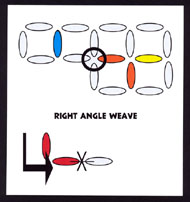
Right Angle Weave is a stitch made up of units with 4 sides. The thread passes through the beads at right angles – never going straight to the next “box”. This causes the stitch to flow in a clockwise and then counter-clockwise motion. It makes it easy to know where you are going because you are always making a turn before adding any beads.
Instructions
Know the length of the bracelet you want to make so it can be measured as you add the “boxes” of beads. Remember to subtract the length of the clasp from the final length so you know how long to make the woven part of the bracelet.
1. The first box is the base. String four of the rice shaped freshwater
pearls onto the Nymo thread. Leave a 12 inch tail, circle back through
two beads and pull the thread tight making a box.
2. Add three pearls and thread through the connecting pearl on the base
box. Thread back through the first bead of the second box.
3. Repeat Step 2 until desired length is reached.
4. With the desired length established, decide which side of the set of
squares is the center line in the bracelet. Weave the thread through the
beads to the position of adding on the second row.
5. Add three pearl beads and thread thru the center line bead. String
the thread thru two more beads to get into position to complete the second
row of boxes.
6. Repeat Step 2.
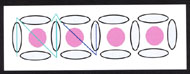
7. Add the embellishment beads to the center of each box by threading
thru the pearls in a criss cross pattern. Pay attention to place the criss
cross in the same direction on each side.
8. Add one side of the clasp to the center line. Draw the thread up the
center line beads in the bracelet and attach the other end of the clasp.
 |
 |
 |
Add a clasp and you have a one of a kind bracelet.
You can add dangles, etc. to make it unique or work in a pattern with the crystals for a different look. This would be a great young girl’s bracelet using kittens, fish, etc.