By Jackie Truty
Materials
10gm Art Clay Paper Type
10gm Art Clay Paste Type
Slotted quilling tool
Craft knife (Excel or other)
Metal Ruler
Teflex sheet
Piece of blank paper
Adhesive tape
Pencil
Fine tipped paintbrush
Tweezers
Small cup for water
Fiber board
Programmable kiln
Rotary tumbler
2 lbs stainless steel shot
Dish soap or burnishing liquid
Template, either round, oval, marquise, or teardrop, less than 2” diameter
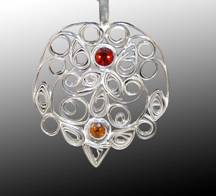
Gemstones (optional)
Small amount of Art Clay silver clay (optional, to form clay collars around gemstones)
Procedure
- Mark the Paper Type with the ruler and cut 1/16” strips with the craft knife. You should be able to cut at least 30 strips from the sheet of Paper Type.
- Cut 4 of the Paper Type strips in half and set aside
- Place the very end of one of the strips full-length strips in the slotted tool and wind the Paper Type up slowly, turning away from you. When it is wound up, squeeze the spiral gently to impart some memory to the Paper Type.
- Carefully remove the tight coil from the tool and allow it to unravel slightly so that the individual rings inside the coil are obvious.
- Hold the coil in your non-dominant hand so that the end is facing outward, and place a very small dot of Paste Type on the inside tip of the strip.
- Touch the end to the coil to close the coil and hold a moment until the clay sets.
Then put it down to dry thoroughly by air. DO NOT SPEED DRYING WITH HEAT. A hair dryer set on the cool setting is acceptable.
- Repeat this process with all but 6 of the remaining strips. Place one sealed coil aside for the bail, which will be attached at the end of the process.
- With the last 8 half strips, roll 4 of them halfway only. Allow the coil to unravel slightly, then add paste type to seal the coil, leaving half of the strip straight. You have created a scroll.
- With the remaining 4 half strips, roll a coil from one end, secure with Paste Type, and then use the slotted tool on the other end to create a coil on the other end as well. Secure this end with Paste Type. You have created a double scroll.
- You have 6 full length strips remaining. Create 3 double scrolls and 3 single scrolls and put aside.
- You will create 2 other basic quilling shapes with the pasted coils. The first is a marquise shape, or eye shape. Take one of the coils and pinch with thumb and forefinger of each hand on either side of the coil. This will produce an eye-shaped coil. The second is a teardrop, which is formed by pinching only one side of a closed coil.
- Trace the chosen template on the piece of paper, dark enough so that it can be see through the Teflex sheet when placed on top of the paper.
- Place a piece of adhesive tape across one corner of the Teflex sheet to secure it to the plain paper.
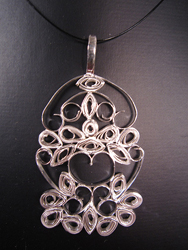
- Begin forming your design from the top down, making sure that every piece is secured to another piece using a drop of Paste Type.
- As you need a certain shape, create it from the available coils by pinching and shaping. You must provide at least 2 contacts for each coiled piece of Paper Type.
- The scrolls can be used for the outer perimeter. Use the tweezers to keep the pieces aligned and within the template border.
- Take Paste type and add to all junctures where the coils, strips and scrolls meet. The side facing up will be the back side of the piece, so make sure the Paste Type is evident only on this side.
- Allow the piece to dry.
- Using a flat piece of cardboard or other flat, rigid object, flip the filigree over and examine the front. Use a sparing amount of Paste Type to make sure all the coils, scrolls and shapes are touching and adhered to each other.
- Take the remaining coil and pinch one end to form a teardrop. Place this at the top of the piece for the bail. Apply Paste Type to attach the bail to the body of the filigree and allow it to dry. Flip the piece over using the technique listed above and reinforce the bail with a little more Paste Type. Dry.
- Transfer the piece carefully to a fiber board for firing.
- Program the kiln for 1600 F. for 10 minutes or, alternatively, to 1472 F. for 30 minutes.
- Allow the kiln to cool if possible, and remove your piece. Do not quench.
- Tumble in stainless steel shot, water and either dish liquid or burnishing liquid for at least 1 ½ hours, or until shiny. Add chain and wear proudly!
Tips for Paper Type success
- Use the minimum amount of Paste Type possible to join pieces.
- Do not allow Paste Type to touch any surface unnecessarily. The moisture in the Paper Type will immediately ruin the surface and weaken the structure.
- If, after firing, you notice any cracks, breaks or separations, use either Overlay Paste or Oil Paste to repair the area. Dry and repeat the firing. Tumble again.
For more information visit www.artclayworld.com . |