| www.beadsbaublesandjewels.com |
| 1611-2 | Print | Close [X] |
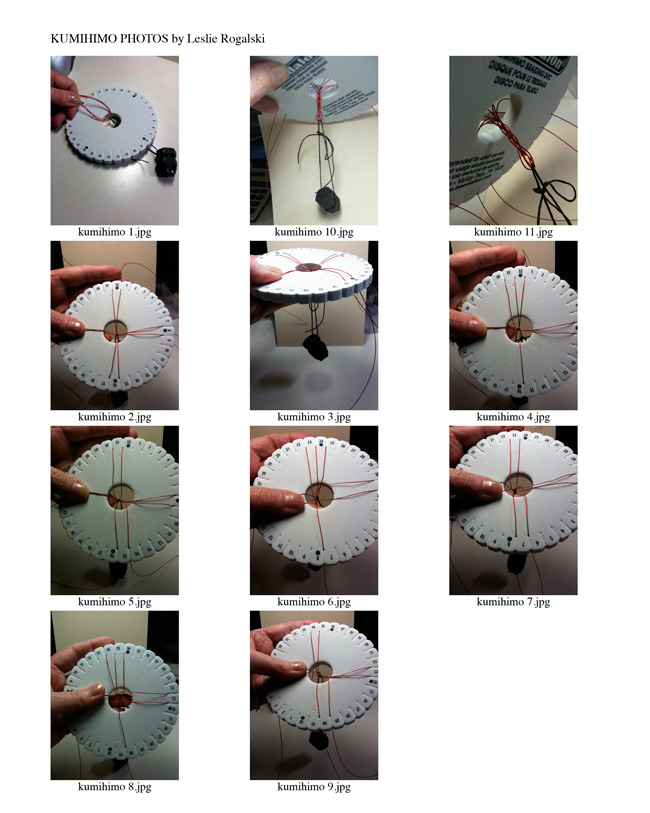
| Leslie Rogalski uses a Kumihimo braiding disk to create intricate beaded braids for necklaces and bracelets. |
For More Information Visit: www.beadalon.com |
Basic Kumihimo without beads 1. Cut 4 wires or cords each 2 and a half times the desired finished length. Fold the cords in half to find their middles and knot or clip together. 2. Position the middle of the wires over the hole of the disk. Attach a weighty object (a large bolt, alligator clip, or washer as examples) beneath the disk to the middle sections, to help pull the cord through the center hole as it is woven. It is removed when the piece is completed. Wire middles can also be marked with a felt tip marker. (PHOTO 1) 3. Arrange the 8 strands around the disk at 90° as follows: between 32 and 1, between 32 and 32; between 16 and 15, 16 and 17; between 8 and 7, and 8 and 9; between 24 and 25, 24 and 23. The beading wires will stay snug in the notches round the disk (PHOTO 2). Allow the gravity of the weighty object to tug gently at the center through the hole (PHOTO 3). Option for long strands: loosely wind the ends into the bobbins and unroll as needed. 4. Hold the disk parallel to your table with the numbered side facing up. Keep number 32 farthest from you. 5. Move the strand between 16 and 17 away from you to the notch between 30 and 31 (PHOTO 4). Move the strand between 32 and 1 towards you between notches 15 and 14 (PHOTO 5). 6. Turn the disk one quarter turn towards you, clockwise, so notch 8 is nearest to you. Move the strand between 8 and 9 away from you and place it in the notch between 22 and 23 (PHOTO 6). Move the strand between 24 and 25 towards you between 7 and 6 (PHOTO 7). 7. Turn the disk one quarter turn towards you, clockwise, so notch 32 is nearest to you (PHOTO 8). Move strand between 32 and 1 away from you into the notch between 14 and 13. Move the strand from between 15 and 16 to between 30 and 29 (PHOTO 9). Turn the disk clockwise so notch 24 is closest to you. Note that you always bring the left-hand wire up to the notch to the left of the wires, and the upper right-hand wire down into the notch to the right of wires. The pattern memory aid is: left up (away from you) to the left, right down (towards you) to the right. Always turn clockwise. Repeat for the desired length. Allow the weight to pull the braid through the center hole (PHOTO 10 and 11). Basic kumihimo with beads: Follow the braiding steps, but bring one bead up to the center hole with each wire: Move a wire to its new notch to make a stitch, and push the bead into the hole beneath the strands already in place at the hole. The bead will sit loosely. As subsequent strands are woven, the beads are held in place. For more information visit www.leslierogalski.com .
|
Presented by Katie Hacker |