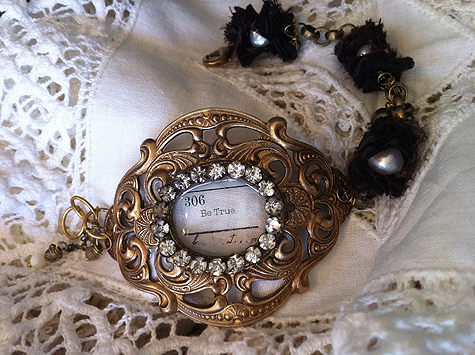
Be True Bracelet
Kristen Robinson
Materials List
Open Backed Bezel
Transparency
ICE Resin®
Measuring Cup
Craft Stick
Antique Gold Chain
3 8mm Potato Pearls
3 10mm Antique Gold Jump Rings
6 3mm Topaz Crystals
1 4mm Mother of Pearl Bead
1 6mm Taupe Pearl
Silk Ribbon (approximately 12” w x 6”l)
8 2 gauge Antique Gold Head Pins
4mm Jump Ring
Clasp
Vintage Rhinestone Slide
22 Gauge Antique Gold Wire
Packing Tape
Adhesive
Tools
Bone Folder
Silicone Sheet or Nonstick Craft Sheet
Round Nose Pliers
Wire Cutters
Flat Nose Pliers
Bracelet Mandrel
Rawhide Mallet
Scissors
Instructions
1. Cut a 6 inch piece of packing tape and adhere to the back side of the bezel, fold each end up and over as this will allow for a place to hold the tape
2. Using a bone folder burnish all edges of the tape
3. Per package instructions measure resin into cup, using a craft stick mix approximately ¼ ounce of resin for two minutes doing so in a folding motion
4. Place the bezel onto a silicone sheet. Pour the resin into bezel – doing so in slow motion making sure the entire opening is full
5 Print desired image or word onto a transparency
6. After the resin has dried for a few hours cut the image to size and place into the bezel (onto the top of the resin)
7. Place a few drops of adhesive onto the back of the rhinestone slide and position on the top of the bezel as this will keep the rhinestones from shifting during the second pour.
8. Mix an additional batch of resin and place a small amount onto the top of the transparency making sure the edges of the rhinestones are also embedded in the resin.
9. Once the resin has fully dried remove the packing tape and shape the bezel into a cuff using a rawhide mallet and mandrel
10. To the right side of the bezel (when facing you) create a wrapped loop using 22-gauge antique gold wire.
11. Onto the wire place approximately 6” silk ribbon that has been cut approximately ½” wide
12. Onto the same wire place one potato pearl followed by an additional 6” of ribbon. Create a second loop, wrap to close and trim excess wire.
13. To first wrapped loop link attach ½” of chain. Follow this with an additional ribbon stack, hen an additional ½” of chain followed by one more ribbon stack.
14. To the last ribbon stack attach 4mm jump ring followed by a clasp, close the jump ring.
15. To the remaining side of the bezel create a chain of three 10mm jump rings.
16. To the first jump ring attach 1” of gold chain.
17. Onto one head pin place one mother of pearl bead followed by one topaz bead.
18. Create a loop at the top of the head pin, place the loop through the bottom of the gold chain (in step 16) and wrap to close, trim any excess wire.
19. Place one topaz bead onto five of the headpins. Create a loop at the top of each bead and set aside.
20. Onto one headpin place one topaz bead followed by one topaz pearl.
21. To the jump ring chain attach two of the topaz-adorned headpins.
22. To the adjacent side attach the remaining topaz head pins, alternating with the topaz and pearl stacked head pin.
Tips
- Be sure to handle your piece on the ends only as this will keep the back of the bezel finger print free
- In lieu of transparency paper rubber stamps and a Solvent Ink may be used on acetate
- If you are unable to locate a rhinestone buckle that is suitable for your bezel a strand of rhinestones may be used in it’s place
- If possible have more than one project prepared as this will allow you to utilize all mixed resin
|