 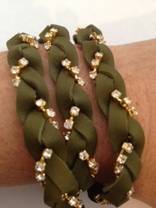 
Wrapalicious Leather Bracelet©
By Create Your Style with SWAROVSKI ELEMENTS Ambassador
Laura Timmons of Vintage Moon Creations©
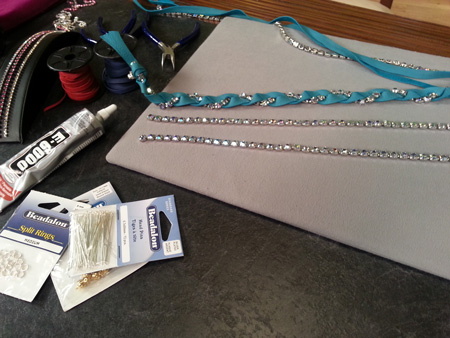
Swarovski Elements Needed:
25 inches of desired size Cup Chain
Additional Supplies:
2 yards of Deerskin Lace, cut in half
2 jump rings
1 magnetic clasp
glue if desired
old cutters
scissors
string (for measuring, if you want)
pliers
Tips:
You have ample cup chain to adjust to any size bracelet. Remember this will wrap three times. You might need to measure against your wrist while you are braiding. You can also cut a piece of string to measure what length you will need. The clasp and jump rings will usually add about an inch. Keep in mind too, that you can stretch out your bracelet some too, after you finish it.
Getting Started:
Start your bracelet, by creating a slip knot with your 2 strips of leather (try to keep the smooth side of the leather up, so both strips are smooth side showing) – leaving about a 1 ½ inch tail of leather (you can make this tail any length that you want – it’s truly just personal preference) at the end-don’t tighten the knot yet. Slide one end of your cup chain underneath the knot. Here you can place a small amount of glue on the underneath side of the cup chain, against the leather if you so choose (I usually do not), and tighten the knot to lock the cup chain into your bracelet.
Almost There:
From this point, you will start braiding, using the two strips of leather, and the cup chain as your three strands. I usually place my knot end under something heavy, or tape it down to a table to hold it steady as I braid. (Or a helpful friend, always works nicely!) While you are braiding, work very carefully to keep the leather strands smooth side up. Measure against your wrist, or your string guide to decide where you need to create your end knot.
Once you have determined the proper length for your bracelet, create a knot, and capture the cup chain into that knot. Before you tighten the knot though – you might double check the length, and also place a small amount of glue onto the leather to further secure the cup chain. Now you can cut your cup chain, by using some old cutters. You will be cutting the little metal piece that is in between each of the crystals out – this little link holds the crystals together. Now you can cut the end of your leather strips, the length of tail that you desire.
The Finishing Touch:
Now it is time to add the jump rings, and magnetic clasp. Open each jump ring, by using two pliers to hold the ring steady, and push the end sides to the front and back. Never open a jump ring by pulling the ends out to the side-this weakens the jump ring, and also distorts the shape. Slide one side of the open jump ring onto one of the leather strips at the knot. Slide on one side of the magnetic clasp, and close the jump ring up, using the same movement as when you opened it-just bringing them back in. Repeat on the other side of the magnetic clasp, and leather knot end. Voila! You are now ready to wear your groovy new bracelet!
©2012Vintage Moon Creations, Laura R. Timmons,
laurartimmons@gmail.com, www.vintagemoon.net
“Sparkle” your imagination….”Embellish” your creativity!
|