| www.beadsbaublesandjewels.com BBJ – the source for jewelry making, beading, and metal work: instructions, education and projects from leading jewelry designers, and instructors. The online home of the public television program. |
| 1903-2 | Print | Close [X] |
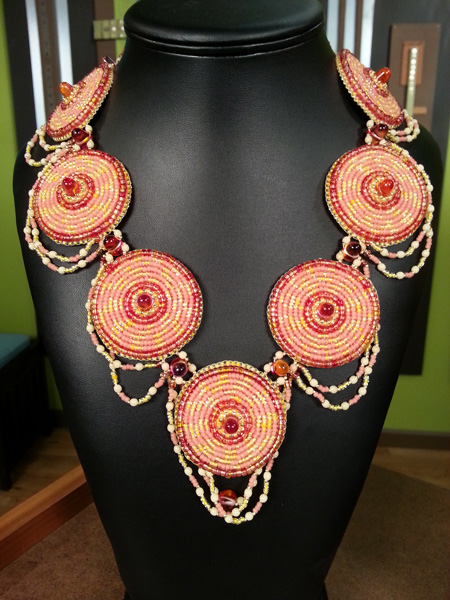
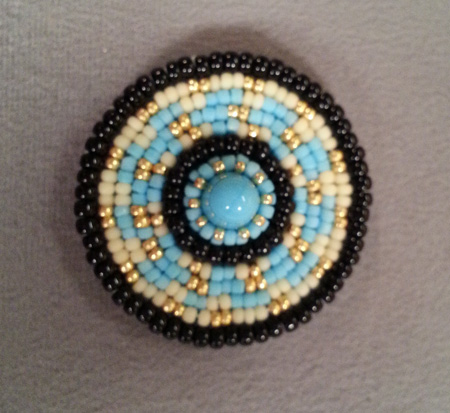
Jen Van Benschoten creates gum drop bead embroidered mandals.
|
For More Information Visit: |

Tools:
Step 1: For each mandala, cut 1 square of Nicole’s Beadbacking, about 1 ¾”. Step 2: Come up through the Nicole’s about 1 bead width from the gumdrop. Pick up 2 size 11 seed beads and push them down against the Nicole’s. Stitch down, working in backstitch, to secure the beads to the Nicole’s. Step 3: Pick up 1 size 11 seed bead, skip the next bead in the ring, and pass through the next bead. Working in peyote stitch, continue stitching around the gumdrop, pulling tightly to form a bezel. Step 4: Work in backstitch to form a pattern around the gumdrop. For the first round, I use size 8 seed beads, and then work 4 rows of size 11 seed beads in various patterns. This is where the meditative part of the beadwork comes in: have fun creating your own patterns. You can repeat the same pattern over and over, or make each round a different pattern to contrast with the previous rounds. Work the last round using size 8 seed beads. Tie off your thread, weave through the beads one more time, and then pass down through the Nicole’s and trim your thread close to the beadwork. Step 5: Place your completed mandala on a piece of stiff cardboard or a piece of a cleaned plastic milk jug. Trace around the mandala. Step 6: Cut a piece of beading thread, about 3’ long. Pick up one size 11 seed bead and pass through the mandala and the Ultrasuede, then back through the seed bead. Pull so that the seed bead rests up against the edge of the mandala, hole side facing perpendicular to the mandala. Step 7: If you have enough working thread, you can embellish the brick stitch edging using beads of your choice. Picots are nice using size 11 and size 15 seed beads, or you can add tiny loops using clusters of farfalle beads for a lovely edge. Step 8: Decide how you want to use these mandalas. You can connect them easily using accent beads such as round druks and other gumdrop beads, or crystals, gemstones, and even larger seed beads. Step 9: Add the clasp of your choice, using a seed bead loop, or a jump ring sewn into the brick stitch edging. For more information visit www.vanbeads.blogspot.com
|
Katie Hacker & Jen Van Benschoten |