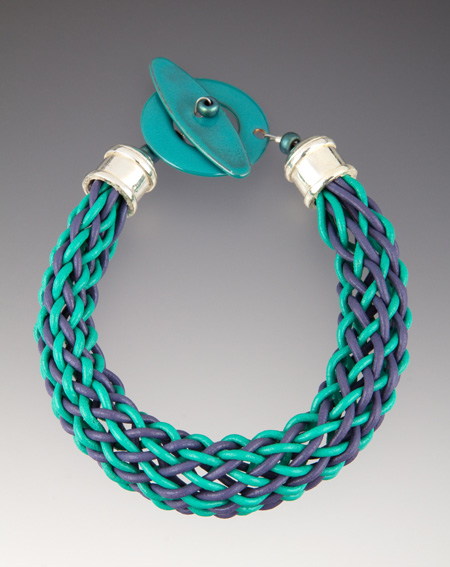
Leather Kumihimo Bracelet – Jill Wiseman
Working with leather in kumihimo can be a bit challenging because it’s much thicker to work with – I use either 1 or 1.5mm diameter leather cord.
We’ll be using a clean start on this so we don’t waste a lot of leather. So cut 8 cords that are 6x the length of your desired finished bracelet. Half of the cords are one color and half the other (or you can mix!)
If you decide to make a custom mix or placement of your cords – here’s a great tip. Document it! If you really love the way it turned out you’ll want to be able to recreate it. The easiest way? Use your cell phone camera to take a photo of the setup of your loom before you begin, and then take a photo of the resulting braid after.
Find the center of the cords, and tie a small piece of thread or cord around the middle with an overhand knot. You’ll need to get this out later, so don’t get carried away!
Place your cords on the loom so that the knot is laying across the center hole.
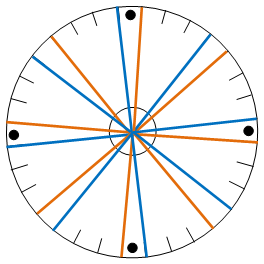
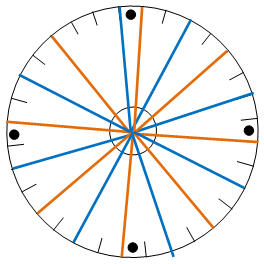
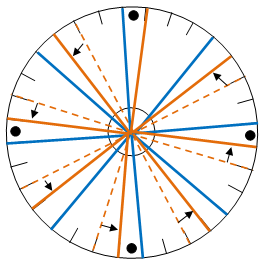
Position the cords as shown in the diagram. Note there are two empty slots between sets of cords.
For color placement, I set mine up with alternating colors.
Step 1:
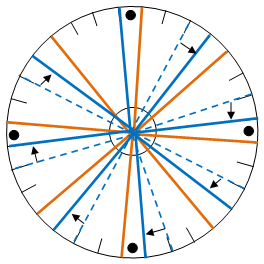
The way I remember these moves is thinking “jump over one, take the middle.”
So – take the first cord on the upper left side of the dot, and place it in the first open slot before the next bundle (you “jumped over one cord.”)

There are now three cords together in that bundle – take the middle cord, and jump over one to place it in the first open slot before the next bundle.
Continue all the way around the disk.
Notice that if you set your cords up in alternating colors the way I did, you’re working all with a single color on this step.
Step 2:
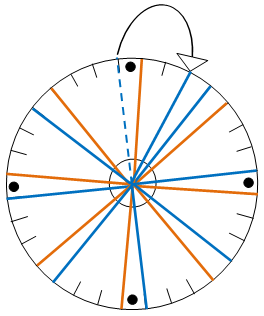
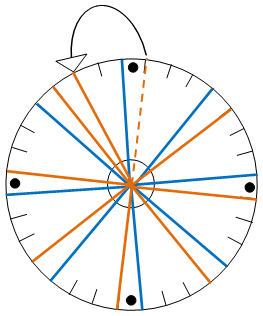
Now we have to re-position the cords. When you finished going all the way around, you should have ended up with something that looks like the illustration. Notice that the cord color you were moving (in this case, blue) is one slot off from where it started.
 One at a time, move the cords you just worked one slot clockwise so that the disk looks like it did when you first set it up – with two open slots between each set of cords. One at a time, move the cords you just worked one slot clockwise so that the disk looks like it did when you first set it up – with two open slots between each set of cords.
Step 3:
Now you’ll go back to “jump over one, take the middle” again, but this time you’ll work counter-clockwise around the disk (using the second cord color if you alternated colors.)
Jump over one…
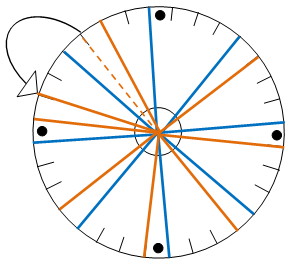 Take the middle…. Take the middle….
Continue all the way around the disk.
 Step 4: Step 4:
Reset cords again to the starting position by moving each cord moved in Step 3 one slot counter-clockwise.
Repeat steps 1-4 until you have the length you desire.
Remove the braid from the loom, and if you have enough cord left, tie an overhand knot to keep it from unraveling as you get ready to finish the ends. If you don’t have enough cord, you can bind the end with thread to hold it.
Finishing the Ends
First of all, we need to secure the ends. Take your piece off the loom and tie an overhand knot at the end. Bind the ends with a small piece of some sort of thread.
Using an end cap or cone with no loop on top (Recommended)
Cones or some end caps will have a hole at the end instead of a loop, which means you need to use a short piece of beading wire to attach your clasp.
- Cover the braid end with glue. Let sit for 24 hours before wearing if possible.
- Cut a piece of beading wire (I use .014 or .015 of Beadalon wire) about 4” long.
- Poke the beading wire through the end of your braid, one or two rows of beads down and make one side of the beading wire a little longer than the other (about ½”)
- String a bead cap and one bead over both ends of the wire. The extra bead helps block up the hole of the bead cap. Then string a crimp bead over both ends of the beading wire.
- String one half of your clasp on the longer end of the beading wire.
- Fold the beading wire over and string it back down through the crimp bead, the extra bead on the end, and your end cap (if possible – if you can’t get it down the end cap, just getting it through the extra bead on the end is okay.)
- Tighten by pulling on the longer end of the beading wire and wiggling the crimp bead down so that your clasp can still move, but there’s not a huge amount of excess bead wire showing.
- Using a flat-nose pliers or crimping pliers, flatten the crimp bead. Cut off the extra beading wire with wire cutters.
Repeat on the other end of the bracelet.
Be sure and wait 24 hours before giving your leather bracelet any heavy wear and tear so your glue can dry completely.
For more information visit www.tapestrybeads.com
|