SWAROVSKI ELEMENTS Needed:
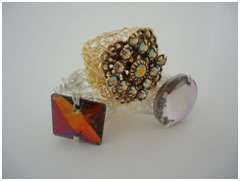
*Any button, sew on stone, or combination of beads you would like to use
Additional Supplies:
*1 spool of non-tarnish wire, 28 gauge, silver or gold
*Crochet hook size F
*Angle Edge Cutters
*Bent Nose Pliers
Tips:
When crocheting your wire, don’t get caught up in trying to create perfect stitches. The beauty of working with wire, is that you can truly mold it, and let it work for you! With this project, you are creating a mesh effect anyways.
Getting Started:
Your ring will consist of two sections of single crocheted wire.
Leaving a 10” tail of wire, you will first chain 12 chain stitches with your wire. Next you will single crochet in each of the 11 chain stitches, chain 1 and turn your row. You will then single crochet in each of the stitches across your piece, for a total of 3 rows including your first chain stitch row. Cut a length of your wire at 10 inches and pull through to finish off this section, by just pulling your wire through your last chain stitch.
***Repeat the same thing just as you did above.
Almost There:
You will lay your sections directly on top of each other, and use your long wire pieces (only using one from each end) – to “sew” down the sides of your sections to secure them into place. Next you will take the other ends, and as you bring the ends of your sections together (forming a ring with your sections) you will now “sew” your sections together. Leave these wires in place for now – you will use them to help secure your crystal embellishment into place.
The Finishing Touch:
Now you will “sew” on your crystal embellishment – whether it be a button, sew on stone, or combination of crystals – you will use your extra wire to “sew” it into place. If you need more wire – go ahead and cut additional length of wires to help “sew” it on. Once you feel that it is secure-you can take all of your wires, twist them together, cut short, and “hide” them underneath your crystal embellishment.
©2013 Vintage Moon Creations, Laura R. Timmons, vmc@kc.rr.com, www.vintagemoon.net
“Sparkle” your Imagination….”Embellish” Your Creativity!™ |