Swarovski Crystallized Elements Needed:
*Crystallized Swarovski Pendants in various shapes and sizes, about 4 or 5 larger ones, and 3 or 4 smaller ones
Additional Supplies:
*40 inches length of Beadalon’s Artistic silver wire in 22 gauge
*1 foot cut of 1 ½ inch PVC pipe
*Cutters
*Bent Nose Pliers
Tips:
This is truly a free form project. Using your own variation of crystals – each napkin ring will be its own unique creation. There is no right or wrong way to wrap your wire – the funkier the wrapping of the wire – the more unusual your creation becomes!
Getting Started:
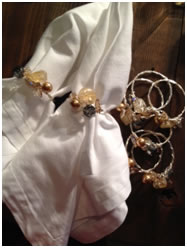
*Using your 22 gauge wire as the base ring of your napkin ring design – find the middle point of the wire. Place that middle point around the PVC pipe. The PVC pipe is going to help you mold the shape of the napkin ring. Bring the wire around the pipe to where it meets together on the other side, cross over the wires, and bring around to the starting point. You are literally wrapping the wire around the pipe. You will wrap the pipe so that you meet the wire six times, for a total of six wires wrapped around your pipe.
*Carefully holding onto the shape of your ring – slide your wire off of the PVC pipe. Your ends are facing opposite directions. You will take each wire, and leading into the opposite direction, coil the wire around all six strands of your ring. Once you have met at the top again, twist your wires together to secure. Now it’s time to add the sparkle!
Almost There:
Now place 2 pendants on each wire strand. You will start to wrap these wires around your ring, securing the crystals into place. Each time you bring the wire back up, you can add another crystal crossing over the top of your crystal base in various areas. Usually you will want to use the smaller crystals on the top of your crystal embellishment.
The Finishing Touch:
Once you have placed all the crystals securely onto the wire ring, take each end of your wire and continue to wrap securely around the ring- one wire on each side of the crystal cluster. This continues to secure all of your crystals in place, as well as reinforcing your wire ring base.
©2010 Vintage Moon Creations, Laura R. Timmons, vmc@kc.rr.com, www.vintagemoon.net
“Sparkle” your Imagination….”Embellish” Your Creativity!™
|