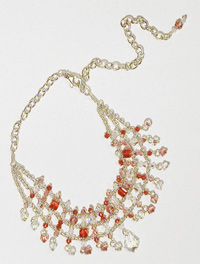
Project 208-3
Crystal and Chain
By Tamara L. Honaman
- Swarovski® Crystals 6mm cube, light rose F14-1769CY
- Swarovski® Crystals 6mm cube, padparadscha F14-1711CY
- Swarovski® Crystals 4mm diamond shape bicone lt rose F14-1136CY
- Swarovski® Crystals 4mm Diamond shape bicone clear F14-1100CY
- Swarovski® Crystals 4mm Diamond shape bicone clear AB F14-1101CY
- Swarovski® Crystals 4mm Diamond shape bicone padparadscha F14-1132CY
- Swarovski® Crystals 6mm Diamond Shape Bi-cone clear AB F14-1201CY
- Swarovski® Crystals 6mm top drilled Diamond shaped drops clear ab F14-2410CY
- Swarovski® Crystals 6mm top drilled Diamond-shaped drops lt. rose F14-2422CY
- Swarovski® Crystals component, baroque drop, clear F14-2660CY
- Sterling Silver Heavy Cable Chain F14-1056CH
- Sterling Silver Flat Cable Chain F14-1162CH
- Sterling Silver Headpins 1 ½” long F14-1753FN
- Sterling Silver Wire 20 gauge half-hard F14-1170WR
- Sterling Silver Jump rings F14-2010FD
- Beadalon® wire cutters
- Beadalon® round-nose pliers
- Beadalon® chain-nose pliers
- Beadalon® flat-nose pliers
Instructions
1. Cut three lengths of flat-cable chain approximately 12” each.
2. String one bi-cone crystal onto a head pin. Pass the head pin through the center link of one length of chain. Add two 4mm bi-cone crystals, then pass the head pin through the center link of another length of chain. Add two 4mm bi-cone crystals, then pass the head pin through the center link of the third length of chain. Add one more 4mm bi-cone crystal.
3. Hold the head pin so gravity works in your favor and all the crystals and chain rest against the head of the pin. Make a simple loop (see “Making a simple loop” below)
4. Add head pins with crystals, spaced evenly, down the length of the chain, leaving approximately 1” of chain on each end without head pins.
5. Open a jump ring and add an ARCHITECTURAL SWAROVSKI CRYSTAL. Loop
the jump ring through the simple loop at the bottom of the head pin in
the center of the chains. Close the jump ring.
Open a jump ring and add a top-drilled diamond-shaped drop crystal. Loop
the open jump ring through the bottom simple loop on one head pin connected
to the chain; close the jump ring. Repeat adding top-drilled diamond-shaped
drop crystals to each of the simple loops along the length of the chain.
6. Cut a 3” piece of 20-gauge wire. Begin a wrapped loop (see “Making a wrapped loop” below) 1 ½” down from one end of the wire. Before wrapping the loop closed, add the last link of all three pieces of chain into the loop. Wrap the loop closed. Begin a wrapped loop on the other half of the wire and before closing, insert a 2-3” length of heavy-cable chain into the loop. Wrap the loop closed.
7. Open a jump ring and add a lobster clasp. Loop the jump ring through the last link of the chain; close the jump ring.
8. Repeat Step 6 but add a 5-7” length of chain in place of the
2-3” length.
9. Add one 4mm bi-cone crystal, one 6mm cube crystal, and one 4mm bi-cone
crystal onto a head pin. Make a wrapped loop, attaching the loop to the
last link of the heavy cable chain before wrapping the loop closed.
Your choker is now complete!
Making a simple loop: Using round or chain nose pliers, grip the wire of the head pin just above the last bead added. Bend the wire to a 90° angle. Using wire cutters, trim the wire to 3/8”. Grip the end of the cut wire with the tip of the round nose pliers; have very little wire peaking through above the barrels of the pliers. Rotate your wrist away from your body, turning the wire into a loop. If necessary, adjust the loop so it is centered over the top of the beads.
Making a wrapped loop: - Hold the round-nose pliers
so the jaws are horizontal and grasp the piece of wire 1 1/2" below
one end. With your free hand, bend the tip of the wire to a 90 degree
angle. Place the pliers so the jaws are now vertical with one jaw above
and the other below the angled section of wire. Bring the tip of the wire
up and over the top jaw of the pliers so it is now facing down at about
an 80 degree angle. Place the pliers so they are horizontal again, one
jaw in the loop and one jaw out and to the right. With chain- or flat-nose
pliers or your free hand, grasp the tip of the wire and direct it behind
the length of wire extending down.
Using chain-nose pliers, open the loop about ¼”; be sure
to do this by lifting the loop up, not out to the side. Thread on any
components being secured at this time. Close the loop and grasp it with
chain-nose pliers. Grasp the tip of the wire with flat-nose pliers and
wrap it around the straight length of wire below the loop, making approximately
three revolutions. Trim any excess wire then press in the cut end with
chain nose pliers.

