Project 212-1
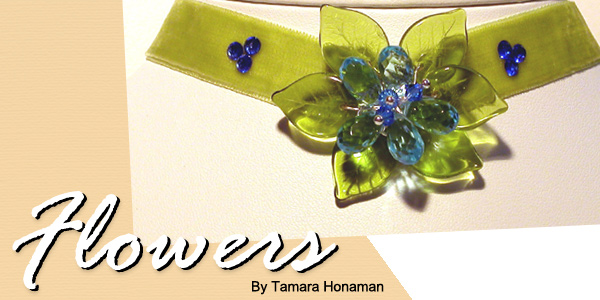
Flowers
By Tamara Honaman
Materials Needed
- Aqua Blue Glass Bead Teardrop F14-3227GB
- Swarovski® Crystal Sapphire bi-cone 4mm F14-1142CY
- Czech-glass pressed leaves F14-2816MD
- Head pins with 2mm ball end F14-8442FN
- Sterling Silver cluster finding, floral with 6-loops F14-4533FD
- Pendant Bail F14-4665FN
- 26-gauge Silver Colour Craft™ Wire F14-1280WR
- Ribbon· Ribbon Clasp finding· Lobster Clasp F14-3240FN
- Jump Rings F14-1997FD
- Nymo D thread F14-1973BS
- Flat Back Swarovski® Crystals F14-2513CY
- Fabric Cement
Tools:
- Beadalon® wire cutters
- Beadalon® round-nose pliers
- Beadalon® chain-nose pliers
- Beadalon® flat-nose pliers
- #12 Beading Needle F14-1028BS
Instructions
1. Cut an 18” piece of 26-gauge wire. String on 5 top-drilled beads and center them on the wire. Cross the wires, close to the last beads, shaping the beads into a flower-like design. Twist the wires together keeping the twist as close to the beads as possible. Twist two to three times only; the wire will break if twisted or bent too many times.
2. Bring both wires through the center hole of the wire base. Bring one wire up through an outside loop, up and over the wire between two briolettes, then down the center hole. Bring the other wire up the center hole, up and over the wire between the same two briolettes, then down the loop the other wire was passed up through.
3. Repeat this pattern all the way around the wire base, passing between each pair of briolettes, securing the beads to the base.
4. Pass one wire up the center hole then over the wire between two briolettes. String on one leaf bead, then pass the wire around the base then back up the center hole. Working around the circle, continue adding leaves as they’ll fit.
If the wire you’re working with is getting short, anchor it to
the wire base by wrapping it around one of the loops, then begin adding
leaves with the other piece of wire.
After you’ve added your last leaf, pass the wire back up the center
hole. Bring it through one of the loops on the back then across and around
the loop of the next hole over – keep some slack in the wire at
the back of the base. The wire should still be on the back side of the
base. Pass it around the loops again, repeating the path, adding some
weight to the loop you’re creating – this will be the loop
you attach your bale to. After two or three passes, anchor the wire by
wrapping it around one of the loops then trim any excess wire with wire
cutters.
5. Thread a 4mm bi-cone crystal onto one head pin. Pass the head pin down the center of the flower then anchor the wire to the wire base; trim any excess wire. Repeat to add 3 – 5 head pins.
6. Cut a length of ribbon so it just fits around your neck. Thread a needle with 1 yard of Nymo D. Stitch the wire base to the center of the ribbon.
7. Place a drop of glue on the back of a flat-back crystal and place on the ribbon. Repeat until you create a pleasing pattern.
8. Press a ribbon finding onto each end of the ribbon using flat-nose
pliers. Add a jump ring to each loop on the ribbon findings, and before
closing one jump ring, add a lobster clasp.

