
301-3
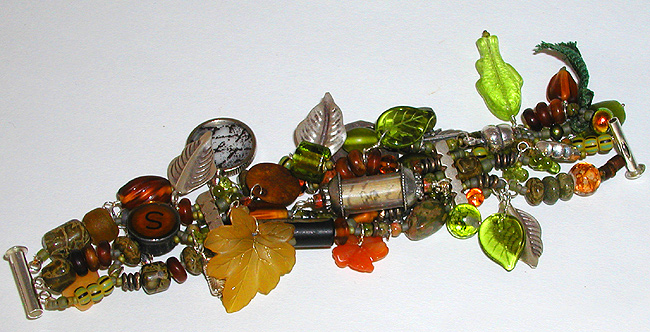
The Dream Weaver
By: Louise McClure
Materials Needed
Creating a scroll charm
2 pkgs sterling silver bead caps for 10~12mm beads (scroll talisman) –
F14-8932FN
1 pkg sterling silver jump rings, 5.5mm, 20.5-gauge – F14-2315FD
Clear tubing
22-gauge craft wire
Craft knife
Sandpaper or scrubby sponge
Scrapbook paper
Adhesive
Wire cutter
Round-nose pliers
Instructions
1. Cut a piece of plastic tubing to desired length. Use a miter-box and
small saw to get a straight, clean cut.
2. Slightly roughen the outside of the plastic tube with the "scrubby"
side of a kitchen sponge, or sandpaper. This will minimize the slick plastic
look of the tube.
3. Select paper image. Use scissors or craft knife to cut image the same
length as the tube and about 1 1/2" long. Roll paper image into a
scroll form and insert into tube.
4. Glue bead caps to each end of the tube. Allow to dry completely.
5. Cut a piece of 22-gauge copper wire twice the length of the tube/bead
cap assembly.
6. Using round nose pliers, form a simple loop at one end of the wire
and thread into center of tube. The wire should pass through the center
of the scroll so it is not visible through the tube.
7. Form a simple loop at the opposite end of the wire, shaping it so it
rests closely to the bead cap.
Tip: You may wish to embellish the wire with beads before forming the eye-loop. Dangles can also be added to the end of the loop before the final wire-wrap, or added with jump rings.
Attach a jump ring to the top of the loop and set is aside.
Creating the bracelet of your “Dreams”
Materials Needed
3 pkg's Hill Tribe silver leaves, 27.5mm x 16mm F14-8067JW
1 sterling silver box clasp set w citrine – F14-1710FD
1 sterling silver box clasp set w carnelian – F14-1713 FD
1 sterling silver toggle clasp, 22mm F14-1695FD
1 pkg button/pendant converter, silver plate, 20mm – F-14-2934FD
1 rainbow tonal selector F14-3127TL
2 sterling silver slide-lock 3-strand clasp – F14-5956FN
1 pkg sterling silver jump rings, 5.5mm, 20.5-gauge – F14-2315FD
1 spool 22-gauge sterling silver wire, dead soft - F14-1038WR
1 spool 26-gauge sterling silver wire, dead soft - F14-1016WR
1 pkg sterling crimp beads, 2mm - F14-1893 FD
2 strands green rondelle pearls, 5.5 x 3.5mm - F14-1411 PL
2 strands peridot briolettes, smooth, 8 x 4mm ~ 5 x 5mm - F-14-5312GS
2 strands green jasper rondelles, graduated 8 ~ 11mm - F14-6984GS
2 strands amber 5mm rounds - F14-3470GS
1 strand aragonite bear fetish - F14-3506GS
2 strands chrysanthemum stone, 10 x 5mm button - F14-3603GS
1 strand faceted round peridot 2 ~ 3mm - F14-5449GS
1 strand faceted rondelle peridot 5mm - F14-3989 GS
2 strands unakite rounds, 4mm – F14-4146GS
1 strand unakite bear fetish - F14-4150GS
3 pkgs carved carnelian flowers, 14mm – F14-3301NB
2 pkgs, carved leaf carnelian, 25 x 20mm - F14-2721NB
2 strands pen shell heishi, 2 ~ 3mm – F14-4368GS
1 strand horn rondelles, 6 ~ 8mm - F14-3525NB
1 strand antiqued buri rounds, 8mm F14-3837NB
1 pkg olivine Czech pressed glass leaves, 18 x 13mm - F14-2816MD
1 pkg olivine Czech pressed glass leaves, 9mm - F14-2716MD
1 pkg olivine fluted rounds, 8mm - F14-1716MD
2 Paula Radke orange/clear/black barrel bead, 15 x 9mm - F14-9644GB
6 Paula Radke orange/clear/black, 6mm - F14-4618GB
1 strand green handmade glass beads, 9 ~ 10mm - F14-8549GB
1 strand brown handmade glass beads, 9 ~ 10mm - F14-8548GB
1 pkg. bead assortment, translucent matte amber - F14-5099GB
2 sterling silver heartline bear bead, 15 x 10mm - F14-1520MB
2 pkg. Rajasthani sterling silver oval w/leaf, 13 x 6mm - F14-5911MB
1 pkg. Rajasthani sterling silver corrugated 1/2 moon, 12 x 9mm - F14-5904MB
2 sterling silver large arrowhead charm - F14-2669FD
2 sterling silver acorn charm - F14-2781FD
2 sterling silver pinecone charm - F14-2700FD
1 pkg. sterling silver feather charms - F14-4668FN
1 pkg. sterling silver small arrowhead charms - F14-2533FN
1 spool brass ball chain, 2.2mm - F14-1319CH
1 spool brass ball chain, 3.4mm - F14-1321CH
1 pkg. ball chain closures, 2.4mm - F14-1303FN
1 pkg. ball chain closures, 3.2mm - F14-1301FN
3 pkgs. vermeil bead caps for 10 ~ 12mm beads - F14-4624FN
1 spool silkon cord size #2 green - F14-1064BS
1 spool silkon cord size #2 light brown - F14-1082BS
1 spool silkon cord size #2 brown - F14-1085BS
Scissors
Macramé work board
Crimping pliers
Instructions
1. Decide if you are making a bracelet or a necklace. Measure your wrist
diameter if making a bracelet (or measure neck diameter if making necklace);
add about 1/4" for ease of movement, i.e. 8" wrist diameter
plus 1/4" equals 8 1/4" - converts to 210 mm.
2. On your macramé work board, layout the clasp ends, left and
right at opposite ends of wrist measurement. Pin them in place with "T"
pins, i.e. left clasp end @ the "0" mm and right clasp end @
the "210mm.”
3. Divide wrist measurement by three for two spacer bars, i.e. 210mm divideded
by 3 equals 70 mm for each section. If making necklace, divide measurement
by five for four spacer bars.
4. Place spacer bars at 70 mm intervals. Pin in place with "T"
pins.
5. Visualize written sheet music for the next stage, the beads become
the individual notes on the lines or threads of the music. Experiment
with color emphasis, rhythm, repetition and accents of color and reflective
metallic light. Just as there are subtle shifts and melodies in song,
so shall there be in your work.
Layout your large (10-12mm size) beads between the clasp ends and spacers.
Think of physical balance of weight and where they will appear when you
are wearing the completed piece. Focal points and very special beads should
be towards the center of the piece.
6. Layout your medium (6-9mm) to accent and complement the large beads.
Then, layout the small (4-6mm) beads to bring visual harmony to the whole
composition.
7. Surround yourself with small containers of seed beads, heishi, small
accent beads (3-4mm), flowers, leaves, etc. These are your color palette
bowls, and will be mixed and randomly strung as you weave through and
around the larger beads you have already placed on your workboard.
8. Cut a length of 3-ply nylon cord, four times the original wrist measurement,
i.e. 210mm x 4 = 840mm (or approximately 36"). This will allow plenty
of cord to knot, twine and finish. Another plus...if your piece decides
it wants to be a necklace instead of a bracelet, you have enough cord
to follow the new creative path!
9. Decide which color cord you would like for the other stands. Using
two different colors of cord works well. Cut the desired number of strands
in the colors you have selected, i.e.6-hole spacer bar / 6 or 7 cords
4-hole spacer bar / 4 or 5 cords
10. Finish each end of the strands with a drop of GS-Hypo Cement or Fray
Check spread thinly and evenly for about 10mm along the ends. Allow to
dry. This will enable you to use the strand end as a "needle"
to go through smaller seed beads.
11. Select a cord and hold the ends in one hand, fold in half to find
the center point. Mark with a small alligator clip. Using the layout of
beads as a reference guide, begin in the center of the piece and work
out towards the right or the left end. If you are right handed work towards
the left end first. Pick whichever end is most comfortable for you.
12.String on a bead, slide it to the center of the cord. String on several
more beads of various sizes, shapes, and colors to form a pleasing composition.
We recommend working about 10-15mm of cord at a time.
Place a small alligator clip on the cord next to the last bead to prevent
slipping.
13. Repeat Step 12 on each of your strands of cord, working from the center
of each cord outward. Lay the cords flat on your work board, from top
to bottom, as you string beads. Remember the lines of the sheet music.
14. Begin to weave cords into larger beads as you continue to string one cord then another, progressing about 10-15mm at a time.
Tip: You should have two strands of cord in a large or medium bead. This will give strength and dimensional stability to your piece.
Tip: Fill large-hole beads with size 11 seed beads to reduce stress and abrasion on the cord.
Tip: Use floss-puller to thread multiple cords through large beads or to thread through hollow or filigree beads more easily.
15. Check layout for visual and physical balance and color placement
as you string and weave. Be flexible, add colors, textures and sizes as
you progress. Size 11 seed beads make great "bridges" over larger
beads on adjacent cords.
Tip: Use "T" pins to anchor your work in place. It prevents
slipping.
Keep stringing and weaving cords through beads until your piece reaches
the correct length the center section. Our example was 70 mm.
16. Knot each cord end close to last bead on each cord.
Tip: To knot, form a loop in the cord then pass the cord end through the
loop. Position tweezers inside the loop and grasp the end of the cord
as it exits from last bead. Pull cord end gently to slide loop into place
next to the bead. Pull knot tightly.
Step 17. Thread cords into the holes in the spacer bar and slide bar into
position next to strung section. Form knots as above on each cord as it
exits from the spacer bar. Repeat on other bar.
Tip: Knotting spacer bars into place keeps them vertical and inline, prevents
shifting. The knots become a decorative element in your work. They can
also be hidden by remembering to place a larger holed bead next to the
spacer bar (size 8 or 6 seed beads work well).
Step 18. Continue to string beads on cords and weave into larger beads
in remaining sections to the right- or left-of-center section you just
completed. As you near the end of this section close to the clasp location,
remember to use a large-hole bead next to the clasp. The large hole will
help hide the crimp bead and knot we will use in finishing.
Finishing
Step 19. Slide crimp bead onto a cord. Pass the cord through the loop
on the clasp and back through the crimp bead. Pull the cord gently and
tightly and form a knot next to the crimp bead.
Do not cut the cord yet!
Step 20. Put a dab of GS-Hypo Cement on the knot and let dry. Use floss-puller
to thread cord end back through large-hole bead next to clasp.
Step 21. Crimp the crimp bead with crimping pliers.
Step 22. Cut the end of the cord to about 3-4mm. Touch the end of the
cord with a match or small flame to melt cord end and seal. Careful! Don’t
melt the cord with the beads!
Enjoy your new creation.
| Project Images | |
 |
|
.