309-1
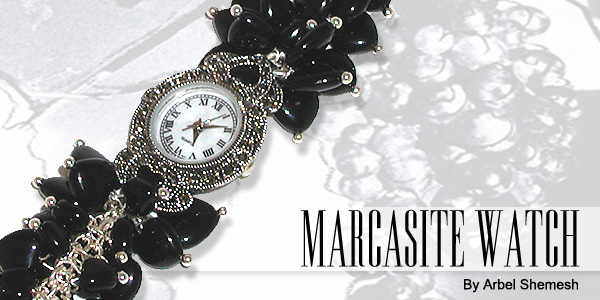
Marcasite Watch
By: Arbel Shemesh
Materials Needed
Sterling silver headpins with ball – F14-4399FN
Marcasite Heart Toggle clasp – F14-5376FD
Marcasite Watch with hearts – F14-5171FD
Figure 8 chain – F14-1054CH
Sterling silver jump ring – F14-2015FD
Sterling silver jump ring – F14-2026FD
Small Czech glass heart – F14-3622MD
Medium Czech glass heart – F14-3722MD
Large Czech glass heart – F14-3822MD
Round nose pliers
Chain nose or flat nose pliers
Instructions
A few tips before you begin:
· Prepare several beads on headpins in advance, this makes for
good work flow.
· Always string heart beads on from the bottom, this way they will
all be facing the same direction.
· Once you have hooked the headpin to the chain you can pick the
whole thing up by the head pin and will not lose your place on the chain.
1. A watch bracelet should fit loosely around your wrist, but not so
loose that it flops around or falls off.
Add the length of the watch face and clasp together (the watch face and
clasp shown equal 2 ¼”). Determine the length you would like
your watch to be, then subtract the watch face and clasp measurement.
Divide the answer by 2 to determine the length of chain you need for either
side of the band. Cut your two lengths of chain; set one aside.
2. Add a heart bead to your headpin. With your round-nose pliers, make a hook at the end of your headpin and pass it through a link in one length of chain, working where two links intersect (the center).
3. Using chain-nose pliers, grip the headpin just above the bead, then complete the loop with round-nose pliers. As the loop forms and is closed, reposition the pliers so they are on the side of the loop, closer to you, holding the loop and the wire together. Continue to turn the loop, forming a second loop right next to the first, similar to a split ring. Make sure the end of the wire goes into the same place on the chain as before, giving you peace of mind that you have a secure loop and the beads won’t fall off.
4. Attach hearts down the center of the chain, one heart per link, alternating the size of the hearts as you go.
Attaching the beads on the sides of the chain:
5. Once you have the middle row of hearts completed, turn the piece over
to see the outside edges of chain. Attach hearts to each side of each
link, alternating between sizes of hearts; this will give you a full effect.
6. Repeat Steps 2-5 using the other piece of chain.
Tip: Leave a few links on the end of one length of chain free and then using this end to attach the bar portion of your toggle clasp (Step10). This will give you freedom to pull the toggle bar and chain through the toggle without beads getting in the way.
Now you’re ready to attach the parts of the bracelet together.
7. Place a pair of chain- or flat-nose pliers on each side of a jump ring;
open the jump ring by moving one plier away from you and holding the other
one steady.
8. Slip the watch face and the last link of the chain onto the open ring. To close the jump ring, bring the pliers back together, and when closing, press the sides of the ring in toward each other to give tension against the joint when the ring is closed.
9. Repeat Steps 7-8 to add the other chain to the other side of the watch face.
10. Use jump rings to attach both halves of the clasp to the chain (remember
to attach the toggle bar to the length of chain you didn’t attach
beads to.)
| Project Images | |
|
|