404-3
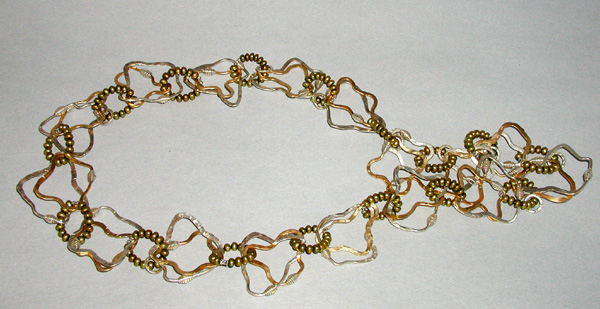
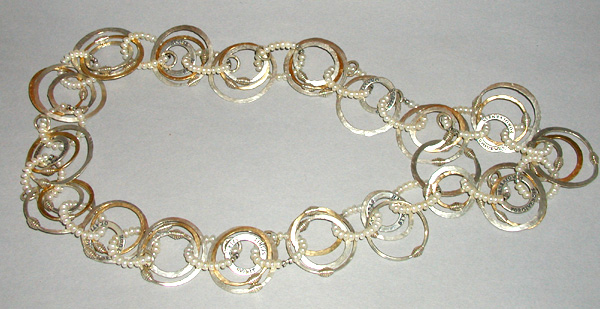
Chain Links
By: Arbel Shemesh
1 Strand freshwater button pearls 4.5-5mm F14-1071PL
10’ (2 spools) 14-gauge round sterling silver wire, dead soft F14-1019WR
Five’ (1 spool) 14-gauge round gold fill wire, dead soft F14-1018WR
3 Sterling silver affirmation spirit charm F14-2906FD
3 Sterling silver affirmation strength charm F14-2907FD
3 Sterling silver affirmation strength charm F14-2901FD
9 Packs hill tribes silver beads (6 beads in each pack) F14-5047MB
5 Packs sterling silver crimp tubes (4 beads in each pack) F14-6915FN
9 Packs hill tribes 12mm flat ring with flower print (2 in each pack) F14-6443MB
1 spool medium weight cable .018
Chain-nose pliers
Memory wire shears
Wire cutters
Hammer
Steel block
Steel wool for polishing metal
Instructions: Making the Metal Rings
Step 1: The 5’ of wire you get from Fire Mountain
Gems and Beads will come as a spool, it’s formed into circles for
you, so all you have to do is cut a complete circle off the spool, one
at a time, for your rings.
Using the memory wire shears cut the 14-gauge wire until you have cut
the entire spool (about 18 rings). Using the shears will leave the ends
of the wire flush so you will not need to file.
Step 2: Cut 18 gold-filled rings so they are a bit smaller
then the large silver rings and can fit inside the silver rings. You can
achieve a smaller ring by cutting your circle off the spool, so it’s
just short of a complete circle; when you hammer them later you can close
the circle.
Step 3: Cut 9 silver rings smaller then the gold rings.
TIPS:
Once you make the first ring in each size, you can use it as a model for
the rest.
This necklace has a hand made look, so just have fun; the rings do not
have to be perfectly round.
Step 4:Place the steel block or an anvil on a solid surface
like a piece of thin cardboard on a carpeted floor, this will muffle the
sound of the hammering and eliminating the need for solid table. Use the
handle of the pliers to hold the ring so you don’t pound your fingers
by mistake. Hit the ring with the widest part of the hammer, flattening
the ring, except for 1/4” at each end; leave this part round so
you can thread on the Hill Tribes silver beads later.
Step 5: Once the ring is flat, use the round side of the hammer
to texture the metal.
The ring will bend where your hammer strikes, keep pressure on the ring
while you hammer any flat spots, this will round them and close the ring.
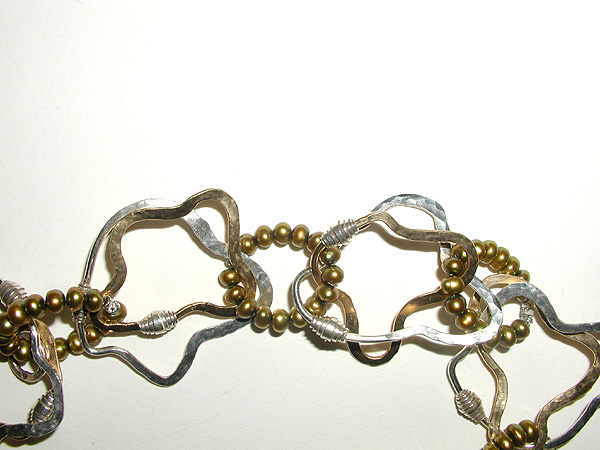
Step 6: The ring should be completely closed or the ends can
overlap slightly. Add the Hill Tribes silver bead to one end then insert
the other end into the bead; the tension on the ends will hold the bead
in place. Make all 45 rings the same way. After you finish your necklace,
if you feel you need to secure the rings further, add epoxy into the bead.
Making the Pearl Rings
Step 7: Cut eighteen 5” pieces of Accu-flex beading
wire.
Step 8: String 2.5” of pearls onto the Accu-flex
– the number of pearls will vary with the size of the pearls. Add
a small Hill Tribes silver ring and a crimp bead. Add an affirmation ring.
Thread the other end of the beading wire through the crimp tube. Use chain-nose
pliers to crimp the middle of the crimp tube. Crimp from both sides and
really press down, test the ring to make sure the wire is secure in the
crimp tube.
Step 9: Begin another pearl link, stringing another
2.5” of pearls on a length of Accu-flex; add the small Hill Tribes
silver ring and a crimp tube. String on the affirmation ring that’s
in the first pearl link, then pass the other end of the wire through the
crimp tube. Crimp the middle of the crimp tube and make sure it is tight.
Step 10: Use wire cutters to snip the extra beading wire
on both sets of pearls.
Step 11: Repeat Steps 8-10, making 9 groups of two pearl
rings joined by an affirmation ring.
Assembling the Chain
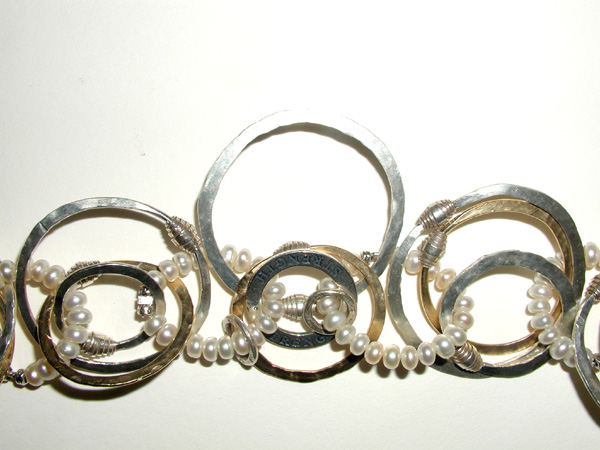
Step 12: Add a gold-filled ring and a silver ring to
the same place you have an affirmation ring. To do this, take one end
of the silve ring out of the Hill Tribes bead, pass it through both pearl
rings and close. Repeat for the gold ring. Repeat this for each of the
pearl groups.
Step 13: Connect the nine sections made in step 12 with
each other, using 3 handmade rings, one large silver, one gold-filled
and one small silver. Add glue to any of the hand made rings that you
are concerned about and the necklace is finished.
| Project Images | |
|
|
|