
407-3
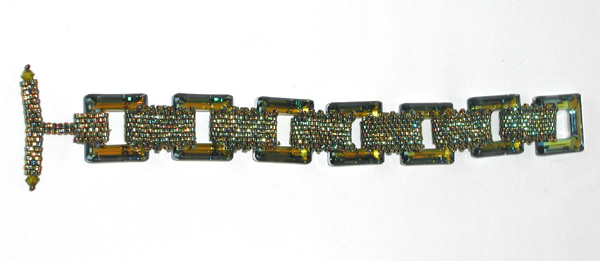
Peyote Linked Diamonds
By Tamara Honaman
12 grams Metallic green Delica beads F14-DB0024V
2 Moss green rocailles F14-2430SB
2 Bugle beads, ½” F14-2066SB
7 Sahara Swarovsk®i diamonds, 20mm F14-4301CY
2 Olivine Swarovski® bi-cones, 4mm F14-3379CY
1 Beading needle, #10 F14-1023BS
1 Big-eye needle F14-1038BS
1 spool Brown Nymo thread, D F14-1969BS
Wax F14-1243BS
Scissors F14-3049TL
Chain-nose pliers F14-3182TL
Step 1: Cut a 2 yard length of Nymo. Thread on 6 green Delicas; bring them to the end of the thread, leaving a 12” tail, which will be used later. The 6 beads will be considered the first row for the instructions, but really only complete half of your first row as peyote takes two back-and-forth passes to complete one full row.
Step 2: Begin the next half.
Pick up a Delica and pass the needle through the next-to-last bead (5th)
strung in the first row. Pull the thread so the new bead and the 6th bead
in the first row are stacked on top of each other. Pick up another Delica,
skip the 4th bead strung in the first row, and pass the thread through
the 3rd bead in the first row. Pull the thread so the new bead and the
4th bead in the first row are stacked. Pick up another Delica, skip the
2nd bead strung in the first row, and pass the needle through the 1st
bead in the first row. Pull the thread so the new bead and the 2nd bead
from the first row are stacked. Notice the zig-zag pattern developing,
with some beads “popped up” and some not.
Step 3: It may be helpful to rotate your work, so you are adding rows
in the same direction each time; do what’s most comfortable for
you.
Pick up a Delica and pass the needle through the first bead that is “popped”
up. Pull the thread so the new bead sits in place, stacked on the end
bead in the previous row. Pick up a Delica and pass the needle through
the next popped-up bead. Repeat one more time, adding a bead between each
popped-up bead.
Repeat this pattern until you have 30 complete rows. You can keep track
by counting the beads along the edge of the developing strip of beads.
Each side should have 30.
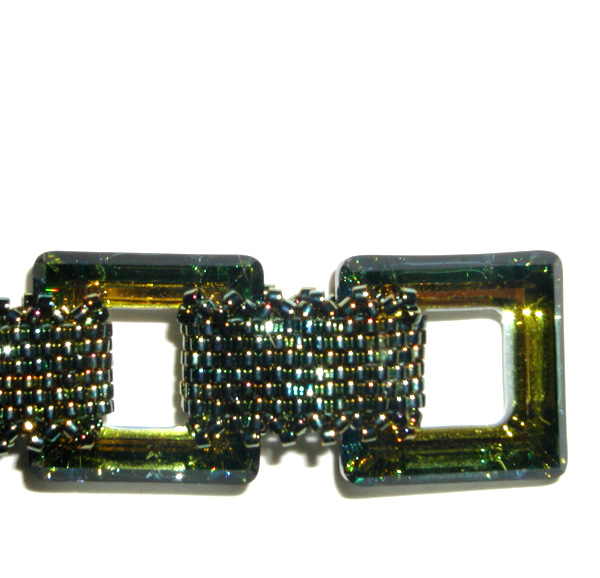
Step 4: It may be helpful to add a picot-edge to your strip, but only
in the places where the strip doesn’t meet the diamond – this
helps keep the strip from spinning once all the diamonds are linked; this
is optional.
Weave your needle by zig-zagging through beads, until it exits the third
bead from the end (either side). Pick up three Delicas. Pass the needle
down the next bead in the strip (4th) and back up the 5th. Pick up three
Delicas, pass the needle down the next bead then up the 7th, that completes
2 picots. Repeat to complete 6 picots.
Step 5: Weave your needle so it exits the 4th bead over from your last picot (18th in the row), leaving three beads without any picot in the center of the strip. Repeat Step 4 to complete 6 more picot.
Step 6: Weave your thread to exit the 2nd bead on the other edge of the Strip. Repeat Step 5 than 4 to mirror the picot edging on the other edge of the strip.
Step 7: You’re ready to link the first two diamonds. Place two diamonds onto the strip so they face back to back.
Step 8: Match the ends of the strip together. Using the thread still remaining, or the tail thread, weave the strip together. You’ll notice they’re in a zig-zag pattern, just like the peyote had when you were weaving the strip. Weave your thread in and out of the beads, “zipping” the ends together.
Step 9: Weave the thread end into the beadwork, zig-zagging, working
around and around the beads until the thread is secure; trim any excess.
If you find any places the needle is having a hard time passing through,
either work in a different direction or carefully pull the needle with
pliers.
Step 10: Repeat Step 9 for the other thread end. Open the diamonds so they sit right-side up; position the areas without picot to be on the insides of the diamonds.
Step 11: Repeat Steps 1-10 until you’ve linked enough diamonds together to equal a bracelet, minus the ¾” the toggle will add later.
Step 12: Repeat Step 1-3 to create a strip that is 14 rows long. Wrap the strip around one side of the diamond on one end of the bracelet. Repeat Steps 8 to close the strip around the diamond.
Step 13: Weave the thread into the beadwork, finding an area that doesn’t have a lot of thread in the beads already. Weave until your needle exits the fourth bead in one row in the strip.
Step 14: Pick up two Delicas. Pass the needle into the third bead in the row then back out the fourth, making a path like a circle. Pass the needle back through the two new beads. Pick up two Delicas. Pass the needle back through the first two Delicas added in this step. Continue the circle pattern, passing the needle back through the two beads just added. Repeat until you’ve created a two-bead ladder, that is five rows long. Set the bracelet aside.
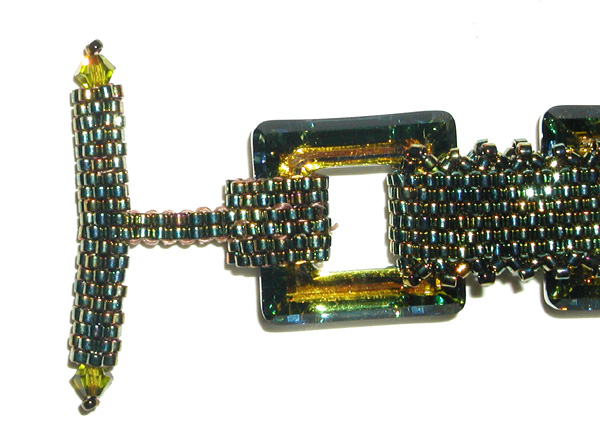
Step 15: Time to create the toggle. Repeat Step 1-3, but create a strip of beads that is 18 beads wide and 6 rows high.
Step 16: Place the two bugle beads on the strip, end to end, spanning the width of the strip. Repeat Step 8 to sew this strip together, making a tube. Weave your thread so it exits one end bead. Remove the needle and replace with the Big Eye needle.
Step 17: Pass the needle down the tube, passing through the bugle beads. Pick up a 4mm crystal and one size 15 seed bead. Pass the needle back through the crystal, without passing through the size 15 seed bead again. The needle will exit the other end of the tube; pull the thread so the crystal sits in the tube.
Step 18: Repeat Step 17 so each end of the tube is accented with a crystal. Continue to pass the needle back and forth through the crystals and seed beads to secure, working until it gets too tight. Carefully weave the needle into the beadwork in the tube. Weave in a zig-zag pattern to end the thread; trim any excess. Weave the other end of the thread into the beadwork as well; trim any excess.
Step 19: Pick up the bracelet. Using the needle on the end of the ladder-stitch
beadwork, weave the thread through two center beads, of one row in the
toggle, choosing and area that isn’t already filled with thread.
Pass the needle back through the last two beads added in the ladder, back
through the two beads in the toggle and back down the ladder, weaving
back and forth, then back into the peyote strip on the diamond. The beads
will begin to get filled with thread at this point – be very careful
pulling your needle through as the beads will break if forced. You can
use a pair of chain-nose pliers if needed.
Weave the thread ends into the bead work; trim any excess.
| Project Images | |
 |
|