
408-1
Lazer Lace Necklace
By: Arbel Shemesh
1 pack Lazer Lace™ disks F14-9069FD
2 packs Lazer Lace™ spirals F14-9062FD
2 packages black Kato Polyclay™, 3 ounces each F14-2608BS
1 Kato Polyclay™ clear-medium liquid, 2 ounce bottle F14-3140TL
Pasta machine F14-3166TL
1 Kato Polyclay™ blade (3-piece set) F14-3141TL
Craft knife set F14-1578TL
Plastic roller F14-3070TL
Needle files F14-2022TL
Sterling silver round jump rings, 4mm F14-1986FD
Sterling silver round jump rings, 6mm F14-2014FD
Sterling silver toggle clasp F14-7846FN
Swarovski® crystal, Xilion® chaton, Peridot, 3.0-3.2mm F14-3119CY
Pigment powders and fixative for the pigment F14-2779BS and
F14-2781BS
Stringing wire nippers F14-1545TL
Chain nose pliers F14-1606TL
Tooth picks – choose ones that are flat on one end and of a good quality so they don’t break easily
There are two types of disks that are used as the links in this project, one is a spiral and the other has one large offset hole and many small holes; We will refer to them as “spiral” and “disk”. Each link will consist of a Lazer Lace™ on each side of a sandwiched layer of polymer. A finished link is 1.25” wide; the clasp adds 1.5”, so for a 19” necklace make 15 links. Prepare 7 links with spiral Lazer Lace™ on one side and disk Lazer Lace™ on the other side; prepare 8 links with spiral Lazer Lace™ on both sides.
Instructions
Step 1: Conditioning the clay:
Cut the block of clay in half with a clay blade. Roll the clay with a
roller, and then roll it through the thickest setting of the pasta machine.
Fold the clay sheet in half and feed through the pasta machine, folded
end first, 20 times.
If the clay breaks apart going through the pasta machine, add liquid polymer
until the clay is smooth, however, the clay needs to be stiff for the
lazer lace to embed well, so
do not add much. If the clay is mushy you can put it in the refrigerator
to stiffen it.
Roll the clay out to the thickest setting once conditioned – preparing
the clay for adding the Lazer Lace™ pieces.
Step 2: Preparing the Lazer Lace™ for the links:
The Lazer Lace™ pieces have a top loop that needs to be removed
for this project. Snip the loop off with wire cutters and file the sharp
ends with a file. Prepare 7 Lazer Lace™ disk pieces and 23 Lazer
Lace™ spiral pieces.
Step 3: Cutting the links:
Place all the Lazer Lace™ spirals and disks on the clay sheet and
cut around with a craft blade; don’t cut flush, leave a bit of clay
around the Lazer Lace™. Use two tooth picks to gently press the
Lazer Lace™ disks into the clay; with the point of a tooth pick,
follow the arms of the spiral from the inside to the outside gently pushing
the spiral into the clay. If you slip and make a hole in the clay, add
clay to the hole and patch it. Make sure the clay is bulging out past
the Lazer Lace™ then gently pat the clay so that the clay will hold
the lace.
Remove the pieces from the tile by running a clay blade underneath each
piece; you will have 30 pieces.
Step 4: Joining links together:
Turn a spiral link over, spiral side down, and place one jump ring at
2 o’clock and one at 10 o’clock; press into the clay. Place
another link on top of the spiral link – clay to clay, pressing
firmly. Cut any excess clay away from the edges, clean out the inside
of the portion of jump rings showing above the links, and smooth the clay
along the edge of the links with your fingers. Repeat to make 7 links
with spiral Lazer Lace™ on one side and disk Lazer Lace™ on
the other side and 8 completed links with spiral Lazer Lace™ on
both sides. Press a Swarovski® crystal into the clay, within a Lazer
Lace™ disk.
Step 5: Adding pigment powders:
With a small paint brush, apply the pigment powders to the clay covering
the whole piece, sides included. Play with combinations of powders for
exotic effects.
Use your finger or a piece of paper to burnish the pigments into the clay,
the pigments will stain your fingers.
Step 6: Baking
Place pieces, spiral side down, onto a baking sheet dedicated to polymer
clay use. Bake the pieces in the oven at 275° for 2 hours, remove
from oven then cool.
Step 7: Repair
After baking, if there are any spaces on the side of the link between
the Lazer Lace™ and the clay, you can fill them with a bit of liquid
polymer , move it around with the tooth pick making sure it goes into
any cracks between the clay and the disks. Don’t leave puddles of
liquid polymer, just a thin coat. Bake again.
Step 8: Testing embossing powders
Test the stability of the powders by rubbing the piece with your finger,
if your finger stains, spray the links with a fixative. The powders are
fixed into the clay but there might be extra powder that will rub off
for a while which can stain your clothes.
Step 9: Connecting the links
Arrange the links in a color pattern pleasing to you. Use the small jump
rings to connect the links.
Use jump rings to attach the toggle clasp to the last link on each end
of the necklace.
| Project Images | |

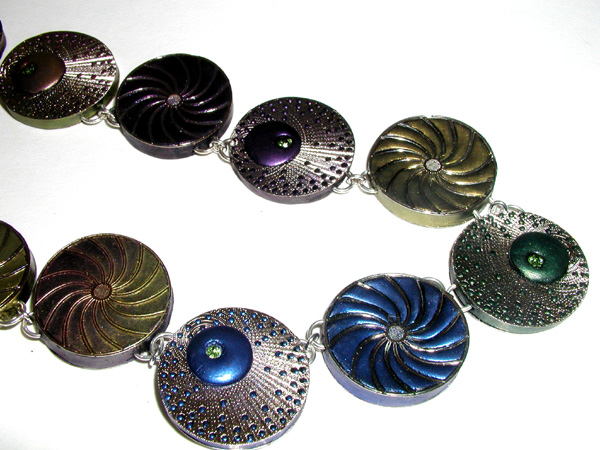
|
|