
409-3
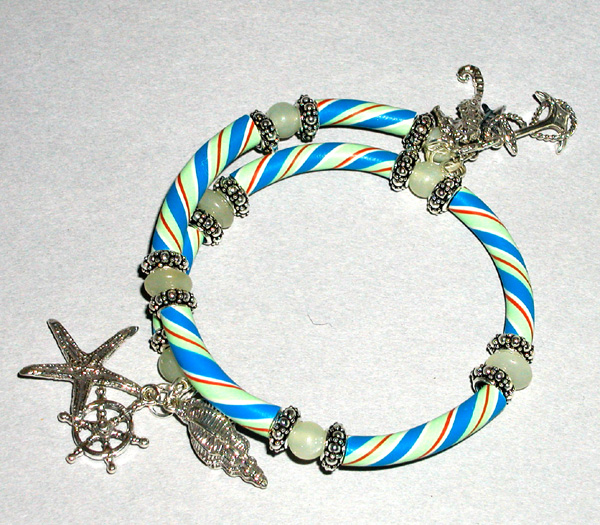
Striped Polymer Charm Bracelet with Memory Wire
By: Judy Belcher
Kato Polyclay in these colors:
Turquoise F14-2604BS
Yellow F14-2598BS
Magenta F14-2601BS
Red F14-2600BS
Green F14-2605BS
White F14-2606BS
Black F14-2608BS
Brown F14-2609BS
Black F14-2608BS
Beach Charms:
Shell F14-5881JW
Seahorse F14-2685FD
Anchor F14-2710FD
Shell F14-2843FD
Starfish F14-2681FD
Pilots Wheel F14-2691FD
Lobster F14-2683FD
Memory Wire F14-2004BS
Sterling Spacer Beads F14-5816MB
6mm seafoam jade beads F14-3717GS
Seafoam jade rondelle beads F14-6371GS
Split Rings F14-2347FN
Pasta Machine F14-3166TL
Polymer Clay Blade F14-3141TL
Round Nosed Pliers F14-1597TL
Memory Wire Cutters F14-2092TL
Thin Knitting Needle
Instructions
Step 1: Cut the blocks of clay and group them in the following increments:
~ ¼ block of yellow, 1/16 block of magenta, and a pinch of red,
for the color tango.
~ ¼ block of yellow, 1/8 block of green, 1/8 block of white and
a pinch of black, for the color aspen.
~ ¼ block of white with a pinch of brown and black, for the color
natural.
~ ½ block turquoise for the color Bermuda.
Step 2: All polymer clay must be conditioned prior to use. Either knead
chunks of clay in your hands or fold and roll sheets of clay through the
pasta machine until clay is soft and pliable, and colors are well blended.
Condition the clay in the groupings listed above, cleaning the pasta machine
between each color.
Step 3: Roll each color of clay out on a medium setting of the pasta
machine.
Step 4: Form a cylinder of clay from scrap clay approximately 1 ½”
tall and 1” in diameter. Make sure there are no air pockets in the
clay.
Step 5: Cut each of the four sheets of colored clay into 1 ½”
tall x varying width strips.
Step 6: Lay the strips of color along the length of the scrap-clay cylinder,
alternating in a pattern you like, working until the entire cylinder is
covered in stripes of clay.
Step 7: Using the knitting needle, drill through the center of the cylinder.
Pinch the ends of the cylinder around the knitting needle.
Step 8: Roll the cylinder against the work surface, applying light pressure
and moving your hands and the clay outward to make the tube smaller and
longer. Twist the clay as you roll, to create twisted stripes.
Step 9: Continue to roll and twist the clay until the tube is the length
of the knitting needle.
Step 10: Remove the lengthened cylinder from the knitting needle and
form the cylinder into a circle, the approximate shape of a loop of memory
wire.
Step 11: Place the clay on polyester batting and bake for 20 minutes
at 275° F.
Step 12. Allow the piece to cool.
Step 13: Using the polymer clay blade, cut the cylinder into six sections.
Step 14: Using heavy-duty wire cutters, cut a 1 ½ loop section
of memory wire.
Step 15: Grip one end of the memory wire with the round-nose pliers and
turn the wire into a small loop.
Step 16: From the other end of the memory wire, string on the beads,
sterling spacers and clay tube beads in a pleasing pattern, working until
the bracelet is full.
Step 17: Repeat Step 15 to make a loop on the second end of the memory
wire.
Step 18: Add various charms to split rings
Step 19: Loop the split rings into the loops at each end of the memory
wire bracelet for a fun finish.
| Project Images | |
 |
|