
410-1
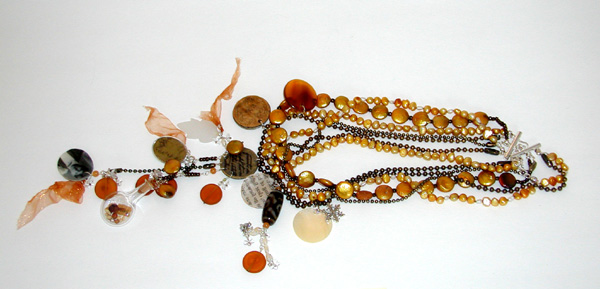
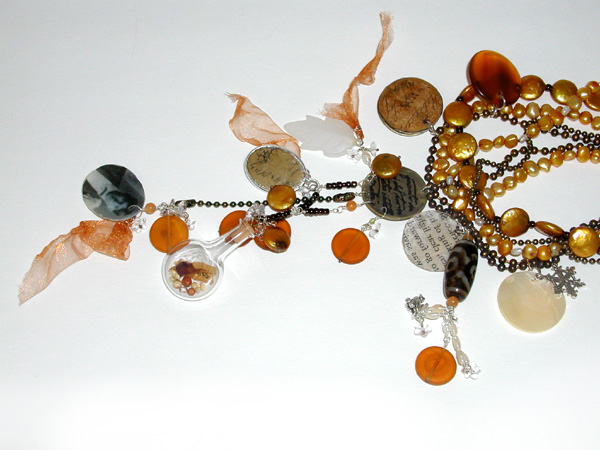
Genealogy
By: Louise McClure
Vintage photographs, antique daguerreotypes, hazy script from old letters and documents, elusive images of people, imagined voices across time. So intriguing. Genealogy is composed of several miniature, hinged journal charms showcasing images from the past and dreams of the future. Decorative scrapbook papers and image transfer medium are combined with beads and baubles to create multi-layered narrative charms. The collection of charms is suspended from a six strand cascade of dyed, analogous colored, freshwater pearls in mixed shapes and sizes, and oxidized brass ball chain. Very simple techniques of stringing & knotting, cutting & pasting, wire wrapping, metal shaping & oxidizing.
Six strand pearl & ball chain necklace with sterling silver clasp (finished necklace adjusts from 15.5~16.5” long)
Materials Needed:
Silkon cord, size #2 dk. Brown F14-1085BS
Pearls, potato shaped, 5-6mm antique gold F14-1418PL
Pearls, coin shaped, 10mm antique gold F14-1536PL
Pearls, rice shaped 2.8-3mm white F14-1023PL
Brass ball chain large F14-1321CH
Brass ball chain connectors, 3.2mm F14-1301FN
Brass ball chain small F14-1319CH
Brass ball chain connectors, 2.4mm F14-1303FN
Bead, peridot, faceted round, 2.5mm F14-5449GS
Bead, glass seed size 8’o iris dark bronze F14-4927SB
Wire, sterling silver 26 gauge dead soft F14-1166WR
Wire, sterling silver 22 gauge half hard F14-1153WR
Clasp, sterling silver three loop with chain for adjustable length F14-6136FN
2 x 2mm sterling silver crimp beads F14-1893FD
Crimp covers, sterling silver 3mm F14-6899FD
Jump ring, sterling silver 5mm .030” gauge F14-1996FD
G-S Hypo-tube cement F14-1956TL
Round nose pliers F14-3181TL
Chain nose pliers F14-3182TL
Wire cutters F14-1545TL
Tweezers F14-3062TL
Bonding Clips F14-1551TL
Crimping pliers F14-1602TL
Liver-of-sulfur antiquing solution F14-3085TL
Other Tools & Materials:
T-pins, fabric covered, tackable work board, stick incense, spray fixative
Instructions
Step 1: Determine the total length of the finished piece including the
desired clasp (example 40cm).
Step 2: Cut three lengths of Silkon cord, each approximately 2.5 times
the desired finished length (example 40cm x 2.5 = 100cm).
Step 3: Coat each end of the cord, for approximately 1cm, with a dab
of G-S Hypo-tube cement and allow to dry.
Step 4: Locate the center of each piece of cord and knot.
Step 5: For first beaded strand, * pick up five 5-6mm potato pearls.
Step 6: Knot close to the last pearl on the strand.
Step 7: Repeat from * to form one half of strand, varying the number
of pearls between the knots (example three, seven, five). Remember to
allow for the clasp dimension in the total measurement (example 40cm finished
length minus 3cm clasp length equals 37cm of beaded cord for the first
strand). Divide this measurement by 2 to find the dimension of the beaded
cord for this step (example 37cm dived by 2 equals 18.5cm).
Step 8: Pick up a 2 x 2mm sterling silver crimp bead.
Step 9: Place a bonding clip onto the end of the cord to anchor the last
bead on the strand.
Step 10: Turn your work and repeat steps 5 through 9 for the remaining
half, to equal 37cm in length and set aside.
Step 11: For the second beaded strand, pick up one 10mm coin pearl and
knot close to the pearl.
Step 12: * Pick up one size 8’o seed bead and one 10mm coin pearl.
Step 13: Knot close to the pearl.
Step 14: Repeat from * to form one half of the strand, approximately
2cm longer than first beaded strand (example 20.5cm).
Step 15: Turn your work and repeat steps 12 through 14 for the remaining
half of the beaded strand, to equal 41cm and set aside.
Step 16: For the third beaded strand, * pick up three 5-6mm potato pearls
and knot close to the pearl.
Step 17: * Pick up one 2.8-3mm rice pearl and knot close to the pearl.
Step 18: Pick up three potato pearls and knot close to the last pearl
on the strand.
Step 19: Repeat from * to form one half of the beaded strand, approximately
2cm longer than second beaded strand (example 22.5cm)
Step 20: Turn your work and repeat steps 18 and 19 for the remaining
half of the beaded strand, to equal 45cm and set aside.
Step 21: Cut a length of the large diameter brass ball chain to equal
39cm with 3.2mm brass connector ends attached to each end. Cut another
length to equal 47cm with 3.2mm brass connector ends attached to each
end. Cut a third length of chain, but this time the small diameter brass
ball chain, to equal 43cm with 2.4mm brass connector ends attached to
each end.
Step 22: Use liver of sulfur, following manufacturer’s directions,
to oxidize the surface of the ball chain strands.
Step 23: Neutralize in soap and water, rinse well, allow to dry.
Step 24: Seal the finish with a light coating of spray fixative and allow
to dry.
Step 25: Refer to basic instructions to form a wire wrapped eye-loop
connector, adding 2mm faceted peridot to the wire, linking the loops through
the ends of each ball chain strand completed in steps 21~24 above and
set aside.
Step 26: Attach the 37cm pearl strand to the top loop (of the three loops)
on one half of the clasp; *remove the bonding clip, thread the end of
the cord through the desired loop on the clasp and back through the crimp
bead from the opposite direction (toward your work).
Step 27: Gently pull the cord until the last bead on the strand fits
snuggly against the crimp bead and knot close to the crimp.
Step 28: Crimp the crimp bead using the two step crimping pliers.
Step 29: Place a dab of GS Hypo-tube cement on the knot and allow to
dry.
Step 30: Cut the end of the cord approx 1cm long.
Step 31: Touch the end of the cord with a lit end of stick incense to
melt the cord and prevent fraying.
Step 32: Secure a sterling silver crimp bead cover over the knotted crimp
to finish.
Step 33: Turn the piece and repeat from * for attachment to other half
of the clasp.
Step 34: Attach the 41cm pearl strand to the middle of three loops on
one half of the clasp by repeating from * to step 33 above.
Step 35: Attach the 45cm pearl strand to the bottom of three loops on
one half of clasp by repeating from * to step 33 above.
Step 36: Attach the 39cm ball chain to the top loop on the clasp with
a jumpring.
Step 37: Attach the 43cm ball chain to the middle loop on the clasp with
a jumpring.
Step 38: Attach the 47cm ball chain to the bottom loop on the clasp with a jumpring.
Drilled Center Medallion
Materials Needed:
Wire, sterling silver 26 gauge dead soft F14-1166WR
Wire, sterling silver 22 gauge half hard F14-1153WR
Metal rippled charm, antique brass 25mm
Round nose pliers F14-3181TL
Chain nose pliers F14-3182TL
Wire cutters F14-1545TL
Other Tools & Materials:
Bench pin
C-clamp
Hobby drill
Hammer
Anvil
Instructions
Step 1: Select a metal finding for the center medallion and hammer it
flat, if desired, using a small rivet hammer and anvil.
Step 2: Mark the drill points at the lower edge using permanent marker,
and tap with the point of an awl to make a slight indentation in the surface
of the metal finding.
Step 3: Clamp the metal finding to the bench pin with adjustable c-clamp.
Step 4: Remember to wear protective eyewear, and drill through the marks
using a small hobby drill.
Step 5: The surface can be embellished with scrapbooking techniques like
rubber stamping and embossing with decorative powders. See basic instructions
(embossing) below.
Step 6: Attach the medallion to the center of the necklace using the wire wrapped eye loop technique in Basic Instructions, below.
See Basic Instructions, below, for adding embellishments with wire wrapping
Hinged Journal Charm with Omni~Gel image
transfer onto “pages” of mother of pearl, mica and horn
Materials Needed:
Omni~Gel, photo transfer liquid F14-3011TL
Station, mother of pearl oval 28 x 22-24mm one hole F14-4644NB
Station, mother of pearl round 24-26mm one hole F14-4640NB
Component, golden horn round 26mm F14-4524NB
Bead, glass topaz coin 15mm F14-5210MD
Wire, sterling silver 26-gauge dead soft F14-1166WR
Wire, sterling silver 22-gauge half hard F14-1153WR
Jump ring, sterling silver 5mm .030”-gauge F14-1996FD
Round nose pliers F14-3181TL
Chain nose pliers F14-3182TL
Wire cutters F14-1545TL
Other Tools & Materials:
Paper ephemera, photographs, letters, book pages, mica tiles, plastic
sheet, decorative edge scissors, scissors, marker, small paintbrush, small
tray to hold water, paper towels, small grommets and grommet setter
Instructions
Step 1: Select images to be transferred.
Step 2: Follow manufacturer’s instructions to transform scrapbook
paper, letters, photos, and other paper ephemera into transparent, flexible
images with Omni~Gel photo transfer liquid.
Step 3: *Select individual “page” elements to which the images
will be attached…mother of pearl shapes, horn discs, glass beads,
mica, plastic, etc.
Step 4: Select prepared images from Step 2 above.
Step 5: Position the image over “page” element where desired,
and trace around the perimeter.
Step 6: Cut out the image using decorative edged craft scissors (example
deckle edge scissors).
Step 7: Brush a thin coating of Omni~Gel onto the surface of the element
and press the prepared image onto the wet surface.
Step 8: Allow the gel to dry and attach the charm to the necklace with
a jump ring.
Repeat from * through step 8 above, varying the “page” element…mother
of pearl shapes, horn discs, glass beads, mica and plastic with the image
applied from the reverse side, etc. Multiple pages can be hinged together
with a single jump ring or with the eye-loop wire wrap technique from
Basic Instructions, below.
See Basic Instructions, below, for adding embellishments with wire wrapping
Charm - adding beeswax to mica or plastic
journal pages above
Materials Needed:
Beeswax F14-1243BS
Omni~Gel photo transfer liquid F14-3011TL
Wire, sterling silver 26-gauge dead soft F14-1166WR
Wire, sterling silver 22-gauge half hard F14-1153WR
Jump ring, sterling silver 5mm .030”-gauge F14-1996FD
Round nose pliers F14-3181TL
Chain nose pliers F14-3182TL
Wire cutters F14-1545TL
Scissors F14-1544TL
Other Tools & Materials:
Small paintbrush, tissue paper, small metal craft spatula
Instructions
Step 1: Select a finished mica or plastic charm from above, with image
applied face-up from the reverse side (example mica acts as a window over
the image).
Step 2: Select the desired color of tissue paper; cut a small piece,
crumple tightly and then smooth out lightly. Retain most of the wrinkles.
Step 3: Brush a little Omni~Gel onto the back surface of the mica charm,
press into the wrinkled tissue, allow to dry then trim.
Step 4: Shave a little beeswax into a microwave safe bowl and melt in
the microwave on low, working for only a few seconds at a time, until
just melted.
Step 5: Working quickly, lightly paint the surface of the tissue with
beeswax. To smooth and glaze the surface of the beeswax, heat a small
metal craft spatula in a flame until warm, then rub it over the rough
beeswax.
Step 6: Allow the wax to cool, then attach it to the necklace with a
jump ring or wire eye loop technique from Basic Instructions, below.
See Basic Instructions, below, for adding embellishments with wire wrapping
Charm - layered, reversible journal in sterling
silver cinch setting
Materials Needed:
Cinch mount, sterling silver oval 25 x 18mm F14-1358MT
Jump ring, sterling silver 5mm .030” gauge F14-1996FD
Omni~Gel photo transfer liquid F14-3011TL
G-S hypo-tube cement F14-1956TL
Wire, sterling silver 26 gauge dead soft F14-1166WR
Wire, sterling silver 22 gauge half hard F14-1153WR
Jump ring, sterling silver 5mm .030” gauge F14-1996FD
Round nose pliers F14-3181TL
Chain nose pliers F14-3182TL
Wire cutters F14-1545TL
Other Tools & Materials:
Paper ephemera, photographs, letters, book pages, bits of lace, mica flakes,
mica tiles, plastic sheet, plastic templates, alligator clips
Instructions
Step 1: Select the size and shape of a sterling silver cinch setting you
like.
Step 2: Select paper ephemera…scrapbook paper, ticket stubs, greeting
cards, photos, etc.
Step 3: Using a plastic template, select the size that matches the cinch
setting.
Step 4: Position the template over the paper until desired image appears
in the template window.
Step 5: Trace inside the opening with a pencil.
Step 6: Repeat Steps 4 and 5 for the image on the back of the charm.
Step 7: Repeat Steps 4 and 5 for cardstock for the center of the charm.
Step 8: Repeat Steps 4 and 5 two times for mica or plastic windows.
Step 9: Cut out the front image, cardstock center, back image and two
mica or plastic windows.
Step 10: Brush small amount of Omni~Gel onto the surface of one side of
the cardstock shape, position front image and press lightly to glue into
place.
Step 11: Repeat Step 10 to apply back image to the reverse side and allow
to dry.
Step 12: Place small dabs of G-S Hypo-tube cement around the perimeter
of the front of the charm, position one mica window and clamp with alligator
clips until dry. Variation…small bits of lace, mica flakes, paper,
etc can be layered inside the charm before the mica window is glued in
place.
Step 13: Repeat Step 12 for the back of the charm.
Step 14: Insert the completed layered charm into the cinch setting, then
close with chain-nose pliers, by pressing the sides of the mount gently
at the top of the setting.
Step 15: Attach to the necklace with a jump ring or wire eye loop technique
from Basic Instructions, below..
See Basic Instructions, below, for adding embellishments with wire wrapping
Charm - patterns on glass with Etch-all
surface etching
Materials Needed:
Etch-all glass etching solution F14-1577TL
Glass topaz coin bead, 15mm F14-5210MD
Sterling silver 26-gauge dead soft wire F14-1166WR
Sterling silver 22-gauge half hard wire F14-1153WR
Sterling silver jump ring, 5mm .030” gauge F14-1996FD
Other Tools & Materials:
Rubber stamps, permanent ink stamp pad and cleaner, clear packing tape,
craft knife, small dish for etching, soap and water, paper towels
Instructions
Step 1: Select a glass coin bead with a flat surface.
Step 2: Press on a small piece of clear packing tape.
Step 3: Using a rubber stamp and permanent ink stamp pad, stamp an image
onto the surface of the tape; allow stamped image to dry. Follow manufacturer’s
instructions to clean rubber stamp with cleaner.
Step 4: Using a small craft knife, cut around the stamped image on the
packing tape and remove the excess. The image that remains on the surface
of the bead will be clear after the etching process.
Step 5: Burnish the remaining tape, on the surface of the glass bead,
to insure a tight bond to the glass when using Etch-all.
Step 6: Follow manufacturer’s instructions to etch/frost the exposed
surface of the glass bead.
Step 7: Carefully neutralize the bead(s) in a soap-and-water solution
and dispose of the etching solution following manufacturer’s instructions.
Step 8: Remove the tape, allow bead(s) to dry and attach to the necklace
with a headpin or drawn-bead eye-loop wire wrap from Basic Instructions,
below.
See Basic Instructions, below, for adding embellishments with wire wrapping
Basic Instructions - embossing
Materials Needed:
Sterling silver 26-gauge dead soft wire F14-1166WR
Sterling silver 22-gauge half hard wire F14-1153WR
Sterling silver jump ring, 5mm .030” gauge F14-1996FD
Omni~Gel photo transfer liquid F14-3011TL
Other Tools & Materials:
Rubber stamps, clear embossing liquid, embossing powders, scrap paper,
embossing tool, small metal craft spatula, tweezers, paper towels
Instructions
Step 1: To enhance the surface of the charm with embossing, select a rubber
stamp in the desired size and pattern.
Step 2: Stamp an image onto the surface of the finding using clear embossing
liquid.
Step 3: Working over a scrap piece of paper, sprinkle the stamped image
with embossing powder.
Step 4: Gently lift the finding, turn on its edge and tap to remove the
excess powder (return excess powder to jar for later use).
Step 5: Place the prepared finding onto a heat resistant surface, hold
in place with the tips of the tweezers and heat evenly with an embossing
tool until powder begins to bubble and turn shiny.
Step 6: Remove from the heat immediately and allow to cool.
Step 7: Seal with a light coating of Omni~Gel and allow to dry.
Step 8: Attach to the necklace with a jump ring or wire eye loop.
Basic Instructions - drawing a bead, wire
wrapping & forming an eye loop
Materials Needed:
Self-igniting butane microtorch F14-3067TL
Sterling silver 26-gauge dead soft wire F14-1166WR
Sterling silver 22-gauge half hard wire F14-1153WR
Jump ring, sterling silver 5mm .030” gauge F14-1996FD
Glass crystal flower bead, 7mm F14-6500MD
Glass topaz coin-shaped bead, 15mm F14-5210MD
Golden horn round component, 26mm F14-4524NB
Freshwater rice shaped pearl, 2.8-3mm F14-1023PL
Sterling silver snowflake charm F14-2694FD
Sterling silver partridge in a pear tree charm F14-2821FD
Faceted peridot round bead, 2.5mm F14-5449GS
Agate (N) Dzi beads, varied sizes F14-2702NB
Gold coin-shaped pearl, 10mm F14-1536PL
Other Tools & Materials:
Butane fuel
Heat-proof surface
Bowl of cold water
Instructions
Prepare your work surface, having a heat-proof surface below your torch
and a bowl of cold water near by.
Step 1: Cut a 3” length of wire, 26- or 22-gauge.
Step 2: Use tweezers or pliers to pick up the wire and place in the tip
of the flame, of an ignited small butane torch. Hold in the flame until
the end of the wire glows and begins to melt into a ball shape.
Step 3: Remove from the flame and allow to cool.
Step 4: Place a bead or pearl onto the new headpin with drawn bead.
Step 5: Grasp the wire, close to the bead, with round nose pliers and
fold wire over into an “L” shape over the lower jaw of the
pliers.
Step 6: Rotate the pliers perpendicular to the wire and bring the wire
up and over the top jaw of pliers.
Step 7: Remove the pliers and reinsert with the wire loop your just created,
between the top and bottom jaws of pliers.
Step 8: Complete the loop by bringing the wire across the wire below the
lower jaw.
Step 9: Remove and grasp the top of the loop with chain-nose pliers, held
in non-dominant hand.
Step 10: Grasp the end of the wire with a second pair of chain-nose pliers,
held in your dominant hand; wrap the wire around the exposed wire between
bead and loop.
Step 11: Clip the end of the wire with wire cutters; tuck in any wire
to be sure the wrap is clean and no sharp ends are peaking out.
Step 12: Attach to the necklace with a jump ring.
Variation: attach a charm with a loop, by forming an eye loop, Steps 5
through 9, adding a charm before closing the loop in Steps 10 & 11.
Repeat steps 5 through 12 to finish the other end with an eye-loop and
attach to the necklace.
| Project Images | |
 |
|