510-3
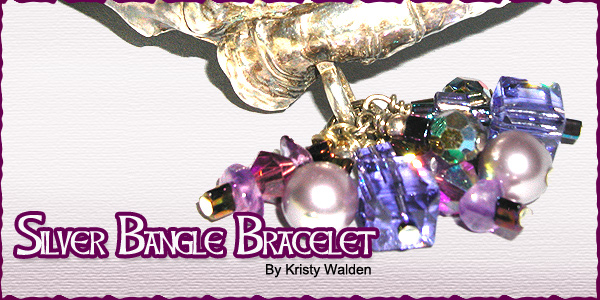
Silver Bangle Bracelet
By Kristy Walden
Material needed
Art Clay Silver Low Fire Slow Dry Clay 50 grams F14-2628BS
Art Clay Silver paste 20 grams F14-2130BS
Sterling Silver upeye F14-4908FN
Swarovski® Crystal Tanzanite cube 8mm beads F14-2268CY
Swarovski® Crystal Tanzanite cube 4mm beads F14-1688CY
Swarovski® Crystal BiCone Amethyst 4mm beads F14-3182CY
Swarovski® Crystal Pearl Mauve 8mm round beads F14-1041GP
Amethyst Gemstone chip Beads F14-3475GS
Hex-cut Amethyst AB seed beads F14-3612SB
Sterling Silver seamless round beads 3mm F14-6585MB
Sterling Silver Headpins 2 inch 26-gauge F14-8440FN
Sterling Silver Jumprings 4.5mm 22-gauge F14-1990FN
Tools Needed
Non-stick work surface F14-3083TL
Plastic Roller F14-3070TL
Fine Steel wire brush F14-3073TL
Needle Files F14-2022TL
Agate Burnisher F14-3069TL
Carving tool set F14-3209TL
Molding Compound F14-2244BS
Paragon Kiln SC-2 F14-3066TL
Liver of Sulfur F14-3085TL
Ergonomic grip round nose pliers
Side cutting ergonomic grip pliers
Chain nose ergonomic grip pliers
Scotch tape
Paint brush-natural hair bristle
Bubble wrap
600 grit-sandpaper
Instructions
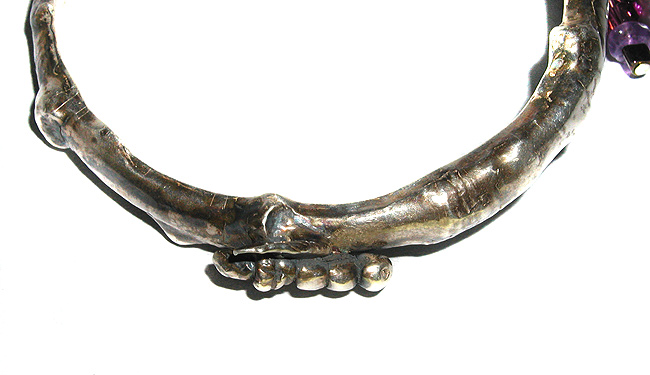
1. Find a tree branch with lots of wrinkles, knots and branch starts.
The branch needs to be as straight as possible and at least 8 inches long.
Leave the bark on for texture.
2. Make a fist with the hand you’ll be wearing the bracelet on.
Measure around the fist to configure how wide the bracelet needs to be.
Add ½” for shrinkage of the clay. Also take into consideration
not to make it too big so the bangle won’t fall off.
3. Use a tapered drinking glass to act as the bracelet mandrel. Measure
to be sure the clay will slide on and off easily. Tape the non-stick work
surface sheets onto the glass.
4. Take equal parts of the two-part mold mixing compound and blend together
until there is no color differentiation; form the compound into a long
snake – long enough to fit the tree branch.
5. Use the plastic roller to gently flatten the mold mix, lay the tree
branch on top of the mold mix and press down to create the imprint. Press
around the sides of the branch bringing the compound up to tightly fit
to the branch. Let the mix cure about 20 to 30 minutes.
6. Take the branch out of the mold and clean the mold getting out any
tree bark and dirt grains.
7. Clean up the workspace and prepare for the clay molding. Lay out the
tools needed: plastic roller, paste, paint brush, prepared drinking glass
and the mold.
8. Open the packets of Art Clay and knead together, until warm and rubbery.
Form the clay into a snake and place into the mold.
9. Start at one end of the mold and press up, pushing the clay with your
thumbs, toward the other end of the mold. Don’t break the clay into
pieces and press in—that creates stress fractures and will cause
the bracelet to break.
10. Take the plastic roller and roll over the mold and clay to smooth
the surface.
11. Turn the mold over and pull away from the clay.
12. Take the pointed stylus type carving tool and cut away the overhanging
clay from the branch form.
13. Turn the clay branch form over—gently, so the flat side is up.
14. Take the drinking glass and lay it on top of the clay gently. Pull
the sides up to meet; use Art Clay paste to secure the two ends together.
Place the up-eye pin into the clay.
15. Place a layer of bubble wrap onto your worksurface and set the glass
down, resting it onto the bubble wrap. The bubble wrap will act like a
cushion so all the weight isn’t on the textured clay. Let the clay
sit for 15 minutes.
16. Stand the glass up and check for any cracks or possible weak spots.
Put paste anywhere that needs re-enforcement.
17. Let completely dry overnight.
18. Take the bracelet off the glass and file any rough edges. Sand the
inside of the bracelet with 600-grit sandpaper.
19. Fire in the kiln at 1250° F for 30 minutes.
20. When cool use the steel brush to clean off the fire scale and burnish
with the agate burnisher or put into a rock tumbler for at least three
hours.
21. Paint on liver of sulfur as a patina, to highlight the wrinkles and
textures.
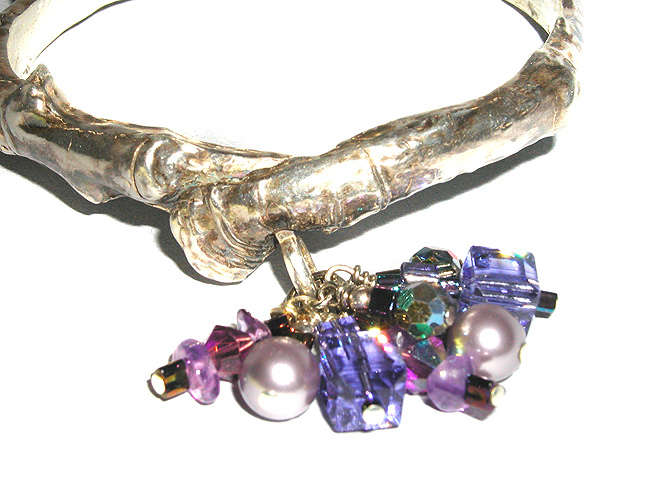
22. Make 2 of each dangle in the following configurations.
· Headpin, hex cut amethyst AB bead, Swarovski® Crystal Tanzanite
8mm cube bead, hex-cut amethyst AB bead, Swarovski® Crystal Tanzanite
4mm cube bead, hex-cut amethyst AB bead; create a wrapped loop.**
· Headpin, Swarovski® crystal mauve pearl 8mm round, hex-cut
amethyst AB bead, sterling silver seamless round 3mm bead; create a wrapped
loop**
· Headpin, Swarovski® crystal amethyst Bi-cone 4mm bead, hex-cut
amethyst AB bead, sterling silver seamless round 3mm bead; create a wrapped
loop**
· Headpin, hex-cut amethyst AB bead, amethyst gemstone chip bead,
Swarovski® crystal amethyst Bi-cone 4mm bead, amethyst gemstone chip
bead, hex-cut amethyst AB bead; create a wrapped loop**
23. Using 2 pair of chain- or flat-nose pliers, open one jump ring. Attach
one of each dangle, then attach to the up-eyepin on the bracelet. Repeat
with the other jump ring.
** Making a wrapped loop:
Using round-nose pliers, grasp the headpin right above the last bead;
bend the wire to a 90º angle. Bring the wire up and over the top
barrel of the round-nose pliers, forming a simple loop. Rotate the pliers,
then continue to bring the wire all the way around the barrel to close
the loop. Grasp the formed loop with a pair of chain-nose pliers and the
tail with chain- or flat-nose pliers. Wrap the tail around the exposed
wire below the loop, until you meet up with the last bead – about
3 wraps or coils. Trim the excess wire then tuck in any sharp edge to
finish.
| Project Images | |

 |
|