
604-3
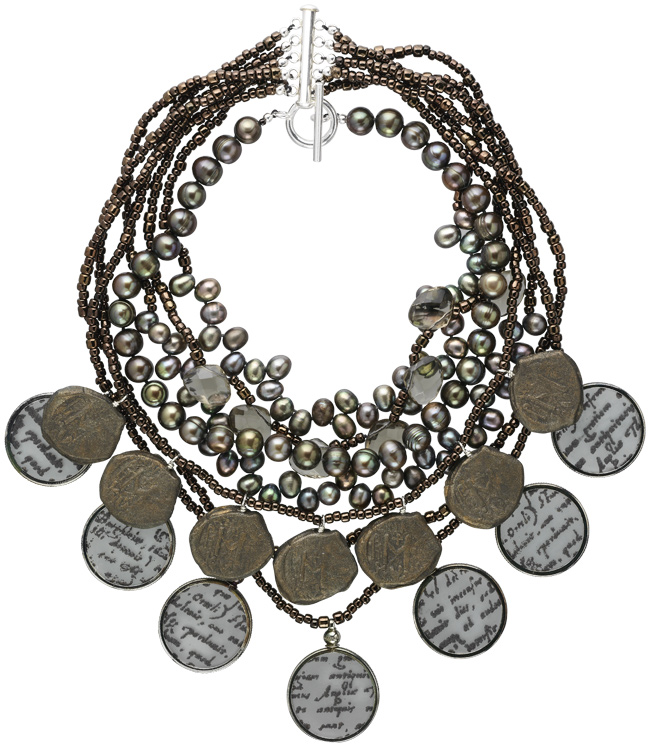
Byzantine Opulence
Designed by Louise McClure
Material needed
1 pkg Art Clay® molding compound, five minute (1 pkg/2-part set)
F14-2244BS
1 Clasp, sterling silver slide lock with 5 loops F14-5958FN
1 Clasp, sterling silver, smooth round F14-8028FN
1 spool Silkon® cord, black medium-weight #2 (1 spool/20 yards) F14-1055BS
1 spool Silkon® cord, black heavyweight #3 (1 spool/20 yards) F14-1056BS
1 pkg Crimp tube, sterling silver 2mm (1 pkg/100) F14-2185FN
1 pkg Crimp cover, sterling silver 3mm (1 pkg/100) F14-2185FN
1 pkg Wire, sterling silver dead-soft, 22-gauge round (1 pkg/5 feet) F14-1038WR
1 pkg Faceted glass, smoke, 15x12mm teardrop (1 pkg/6) F14-3796GL
1 strand Cultured freshwater pearls, bronze, 8-10mm potato F14-2319KL
1 strand Cultured freshwater pearls, gunmetal bronze, 8-10mm rice
1 tube G-S Hypo Cement F14-1956TL
1 pkg Seed bead, iris bronze, size 8/0 F14-4487SB
1 pkg Seed bead, iris bronze, size 6/0 F14-5692SB
1 pkg Seed bead, iris bronze, size 11/0 F14- DB1002V
7 Coin mounts
Tools:
1 pair Scissors, 3 ½ -inch F14-3049TL
1 pair ergo pliers, 5 ¾ -inch short flat nose F14-3177TL
1 pair Crimping pliers
Other Materials (Available in most craft stores.):
1pkg Paperclay®
7 Mirror discs
1 Rubber stamp, script
1 set Boss Gloss embossing liquid, powder and tools
1 Sponge applicator, small
4 Metallic acrylic craft paints in antique gold, silver, green and dark
grey (1 tube of each color)
1 Roman coin replica
1 pkg Corn starch
1 stick Incense
1 can Krylon® spray acrylic sealer, matte finish
1 square 320-grit silicon carbide sandpaper
1 bottle Novacan solution
1 pair Tweezers
1 Safety pin
1 Mica tile (optional)
Please note: This instructional project includes
different design variations- giving you the ability to choose your desired
look.
PART ONE: Making Faux Bronze Paperclay and Stamped Pendants for Necklace
Instructions - Paperclay Pendants:
Step 1: Prepare Art Clay two-part silicon, five minute cold molding compound, following manufacturers directions.
Step 2: Select element to be molded, example: antique Byzantine Follis coin.
Step 3: Press coin into prepared molding compound and let cure, in place, according to manufacturers directions. When cured, release coin by gently flexing mold.
Step 4: Lightly brush interior of mold with cornstarch.
Step 5: Form lump of paperclay into round shape by rolling between palms. Press into mold and let it set for a few minutes.
Step 6: Flex mold to release “coin” and allow to dry completely. Temperature and humidity will influence dry time.
Step 7: Seal with a light coating of spray-on acrylic sealer in matte finish. Allow to dry. Turn and repeat on back of “coin”.
Faux Bronze Finish for Paperclay Pendants
Variation 1:
Step 1:
Dilute dark gray acrylic craft paint with approximately one part water
to one part paint and sponge onto “coin.” Allow to dry. Repeat
on back of coin.
Step 2:
Using fingertip, dab random spots of green acrylic craft paint onto coin,
allowing some of the gray to show through. Allow to dry. Repeat on back
of coin.
Step 3:
Dilute antique gold acrylic craft paint with approximately one part water
to one part paint and dab onto raised portions of coin with fingertips
to create highlights. Allow to dry. Repeat randomly on back of coin.
Step 4:
Apply diluted gray paint mixture from step 1 to further “age”
the coin. Allow to dry. Repeat on back of coin.
Step 5:
Seal with a light coating of acrylic spray sealer. Allow to dry. Repeat
on back of coin.
Step 6:
Cut a 3-inch length sterling silver, dead-soft, 26-gauge round wire; form
a wrapped loop on one end (see instructions below).
Step 7:
Lightly pierce top of coin with a safety pin to start a hole for the eye
loop.
Step 8:
Dab GS Hypo cement onto straight end of eye loop.
Step 9:
Use flat nose pliers to grip loop and gently, but firmly, push eye loop
into hole on top of coin. Allow to dry.
Variation 2:
Step 1:
Dilute dark gray acrylic craft paint with approximately one part water
to one part paint and sponge onto “coin.” Allow to dry. Repeat
on back of coin.
Step 2:
Using fingertip, dab random spots of turquoise acrylic craft paint onto
coin, allowing some of the gray to show through. Let dry and repeat on
back of coin.
Step 3:
Dilute antique silver acrylic craft paint with approximately one part
water to one part paint and dab onto raised portions of coin with fingertips
to create highlights. Allow to dry. Repeat randomly on back of coin.
Step 4:
Apply diluted gray paint mixture from step 1 to further “age”
the coin. Allow to dry and repeat on back of coin.
Step 5:
Seal with light coating of acrylic spray sealer. Allow to dry and repeat
on back of coin.
Step 6:
Cut a 3-inch length of sterling silver, dead soft, 26 gauge round wire;
form a wrapped loop on one end (see instructions below).
Step 7:
Lightly pierce top of coin with a pin to start a hole for the eye loop.
Step 8:
Dab GS Hypo cement onto straight end of eye loop.
Step 9:
Use flat nose pliers to grip loop and gently, but firmly, push eye loop
into hole on top of coin. Allow to dry.
Stamped Pendants
Variation #1:
Step 1:
Sand off the green backing from the mirror discs; rinse and dry.
Step 2:
Apply Boss-Gloss to the rubber stamp and stamp front of disc. Sprinkle
the mirror with embossing powder and tap off excess. Repeat until all
discs are complete.
Step 3:
Place discs, powder side up, on a glass surface. Heat evenly and thoroughly
with an embossing tool until powder starts to bubble and puff up. Allow
to cool.
Step 4:
Seal embossed image with a light coating of matte acrylic sealer. Let
dry and insert into coin mounting.
Tip: If you’d like to antique the coin mounting, do so before inserting the disc. Pour a little Novacan solution into a small glass container. Use tweezers to place the mounting into the solution and soak for a couple of minutes until desired patina is achieved. Carefully follow manufacturer’s instructions for safe use and disposal of patina solution.
Variation #2:
Step 1:
Sand off the green backing from the mirror discs, rinse and dry.
Step 2:
Select a photo or postcard image for front of coin and a mica tile and
decorative paper for the backing. Place the disc over the front image
and trace around the perimeter with a pencil. Repeat process for the paper
backing and the mica tile. Cut out the images and sandwich the layers
in the following order: mirror disc on top, photo facing up, paper facing
down, mica tile on bottom. (Tip: You may wish to apply a drop of glue
between the layers, along the edges, to hold discs in place.)
Step 3:
Insert disc into coin mounting.
Variation #3:
Step 1:
Leaving the green mirrored disc backing intact, select desired rubber
stamp image and apply Boss-Gloss. Stamp face of disc with image.
Step 2:
Sprinkle the mirror with embossing powder and tap off excess. Repeat until
all discs are complete.
Step 3:
Place discs, powder side up, on a glass surface. Heat evenly and thoroughly
with an embossing tool until powder starts to bubble and puff up. Allow
to cool.
Step 4:
Select a photo or postcard image for front of coin and a mica tile and
decorative paper for the backing. Place the disc over the front image
and trace around the perimeter with a pencil. Repeat process for the paper
backing and the mica tile. Cut out the images and sandwich the layers
in the following order: mirror disc on top, photo facing up, paper facing
down, mica tile on bottom.
Tip: You may wish to apply a drop of glue between the layers, along the edges, to hold discs in place. Also, small bits of lace or mica flakes can also be added as embellishments under the mica window.
Step 5:
Seal embossed image side with a light coating of matte acrylic sealer
and let dry. Insert disc coin mounting.
Variation #4:
Step 1:
Sand off the green backing from the mirror discs, rinse and dry.
Step 2:
Select a piece of vintage fabric for front of disc and a mica tile and
decorative paper for the backing. Place the disc over the front image
and trace around the perimeter with a pencil. Repeat process for the paper
backing and the mica tile. Cut out the images and sandwich the layers
in the following order: mirror disc on top, photo facing up, paper facing
down, mica tile on bottom.
Tip: You may wish to apply a drop of glue between the layers, along the edges, to hold discs in place. Also, small bits of lace or mica flakes can also be added as embellishments under the mica window.
Step 3:
Insert disc in coin mounting.
PART TWO: Creating necklace
Combining a single strand and multiple strands
Single Strand
Step 1:
Cut #2 black Silkon cord to three times desired finished length. Dab hypo-cement
onto each end and let dry.
Step 2:
Tie a square knot in the center of the strand. String on a potato pearl
and slide towards center knot. Tie another knot next to the pearl by forming
a single overhand loop. Insert tweezers through loop and grasp the cord
where it exits the pearl. Gently pull the end of the cord to slide loop
towards the pearl and knot tightly in place next to the pearl.
Repeat until necklace reaches the desired length on one side, then continue
stringing and
knotting from the other side.
Step 3:
Slide one size 11/0 seed bead and one crimp tube onto each end of the
cord. Thread cord ends through each clasp end, then back through the crimp
tubes. Tie a knot next to each crimp tube and crimp with crimping pliers.
Dab hypo-cement on each knot and allow to dry.
Step 4:
Clip cord end to approximately 5mm from each knot. Touch cord ends with
lit stick of incense to melt and prevent fraying.
Step 5:
Position 3mm sterling silver crimp covers over each crimped tube, tucking
in cord ends. Close crimp covers with tip of crimping pliers.
Multi-Strand
Strand #1:
Step 1:
Cut #2 black Silkon cord to three times desired finished length. Dab hypo-cement
onto each end and let dry.
Step 2:
Tie a square knot in the center of the strand. String on a rice pearl
and slide towards center knot. Tie another knot next to the pearl by forming
a single overhand loop. Insert tweezers through loop and grasp the cord
where it exits the pearl. Gently pull the end of the cord to slide loop
towards pearl and knot tightly in place next to pearl.
Repeat fourteen times for this side, then continue doing the same for the other side.
Step 3:
In random order, thread size 6/0 and size 8/0seed beads to desired length.
Add one crimp tube onto each end of the cord. Thread cord ends through
each clasp end, then back through the crimp tubes. Tie a knot next to
each crimp tube and crimp with crimping pliers. Dab hypo-cement on each
knot and allow to dry.
Step 4:
Clip cord end to approximately 5mm from each knot. Touch cord ends with
lit stick of incense to melt and prevent fraying.
Step 5:
Position 3mm sterling silver crimp covers over each crimped tube, tucking
in cord ends. Close crimp covers with tip of crimping pliers.
Strand #2:
Step 1:
Cut #3 black Silkon cord to three times desired finished length. Dab hypo-cement
onto each end and let dry.
Step 2:
Tie a square knot in the center of the strand. String on one faceted crystal
and four seed beads in random sizes to the center knot. Repeat three more
times on one side, then complete the following side. Continue adding randomly
sized seed beads until both sides have reached the desired lengths.
Step 3:
Add one crimp tube onto each end of the cord. Thread cord ends through
each clasp end, then back through the crimp tubes. Tie a knot next to
each crimp tube and crimp with crimping pliers. Dab hypo-cement on each
knot and allow to dry.
Step 4:
Clip cord end to approximately 5mm from each knot. Touch cord ends with
lit stick of incense to melt and prevent fraying.
Step 5:
Position 3mm sterling silver crimp covers over each crimped tube, tucking
in cord ends. Close crimp covers with tip of crimping pliers.
Strand #3:
Step 1:
Cut #2 black Silkon cord to three times desired finished length. Dab hypo-cement
onto each end and let dry.
Step 2:
Tie a square knot in the center of the strand. String on a potato pearl
and slide to the center knot. Tie another knot next to the pearl by forming
single overhand loop, inserting tweezers through loop and grasping the
cord where it exits pearl. Gently pull the end of the cord to slide loop
towards the pearl and knot tightly in place next to the pearl.
Step 3:
Repeat fifteen more times, then complete the other side for a total of
32 pearls.
Step 4:
String seed beads in random sizes until each side reaches desired length.
Step 5:
Add one crimp tube onto each end of the cord. Thread cord ends through
each clasp end, then back through the crimp tubes. Tie a knot next to
each crimp tube and crimp with crimping pliers. Dab hypo-cement on each
knot and allow to dry.
Step 6:
Clip cord end to approximately 5mm from each knot. Touch cord ends with
lit stick of incense to melt and prevent fraying.
Step 7:
Position 3mm sterling silver crimp covers over each crimped tube, tucking
in cord ends. Close crimp covers with tip of crimping pliers.
Strand #4:
Step 1:
Cut #3 black Silkon cord to three times desired finished length. Dab hypo-cement
onto each end and let dry.
Step 2:
Tie a square knot in the center of the strand and string one finished
paperclay coin charm to the center knot. Tie another knot on the opposite
side of the coin. String 10 randomly sized seed beads, tie a knot and
add another coin. Repeat until three coins have been strung on either
side of center coin. Continue stringing seed beads until each end has
reached desired length.
Step 3:
Add one crimp tube onto each end of the cord. Thread cord ends through
each clasp end, then back through the crimp tubes. Tie a knot next to
each crimp tube and crimp with crimping pliers. Dab hypo-cement on each
knot and allow to dry.
Step 4:
Clip cord end to approximately 5mm from each knot. Touch cord ends with
lit stick of incense to melt and prevent fraying.
Step 5:
Position 3mm sterling silver crimp covers over each crimped tube, tucking
in cord ends. Close crimp covers with tip of crimping pliers.
Strand #5:
Step 1:
Cut #2 black Silkon cord to three times desired finished length. Dab hypo-cement
onto each end and let dry.
Step 2:
String seed beads of random sizes throughout the entire length of the
strand.
Step 3:
Add one crimp tube onto each end of the cord. Thread cord ends through
each clasp end, then back through the crimp tubes. Tie a knot next to
each crimp tube and crimp with crimping pliers. Dab hypo-cement on each
knot and allow to dry.
Step 4:
Clip cord end to approximately 5mm from each knot. Touch cord ends with
lit stick of incense to melt and prevent fraying.
Step 5:
Position 3mm sterling silver crimp covers over each crimped tube, tucking
in cord ends. Close crimp covers with tip of crimping pliers.
Strand #6:
Step 1:
Cut #3 black Silkon cord to three times desired finished length. Dab hypo-cement
onto each end and let dry.
Step 2:
Tie a square knot in the center of the strand. String one finished embossed
charm to the knot. Tie another knot on the other side of the charm. String
13 randomly sized seed beads, and add one more charm. Repeat until three
charms have been added to either side of the center charm. Continue stringing
seed beads until each end has reached desired length.
Step 3:
Add one crimp tube onto each end of the cord. Thread cord ends through
each clasp end, and back through the crimp tubes. Tie a knot next to each
crimp tube and crimp with crimping pliers. Dab hypo-cement on each knot
and allow to dry.
Step 4:
Clip cord end to approximately 5mm from each knot. Touch cord ends with
lit stick of incense to melt and prevent fraying.
Step 5:
Position 3mm sterling silver crimp covers over each crimped tube, tucking
in cord ends. Close crimp covers with tip of crimping pliers.
| Project Images | |
 |
|