
605-3
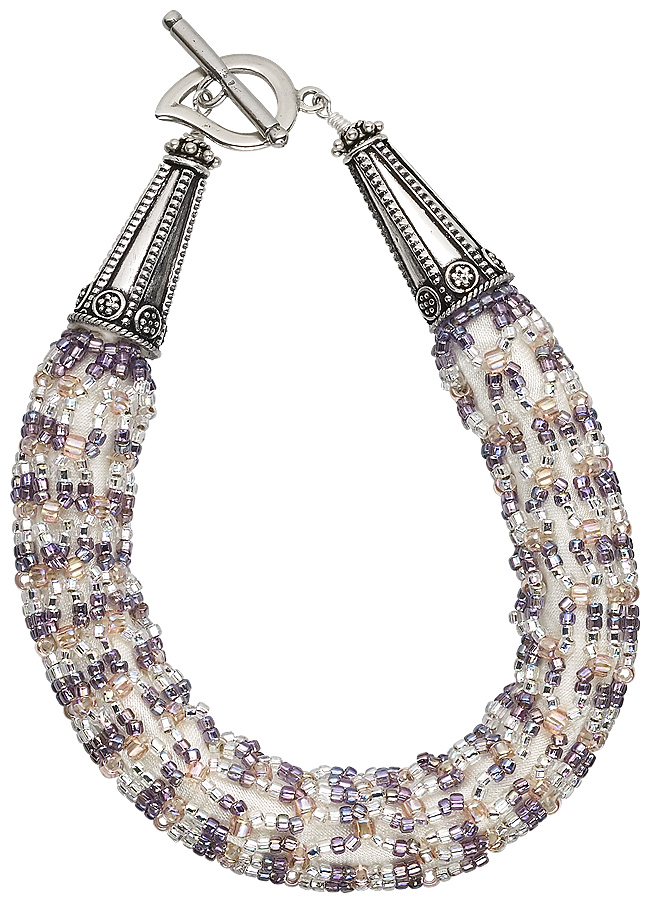
Seed Bead and Satin Cord Netting Stitch Bracelet
Designed by Marlynn McNutt
Material needed
1 pkg Cord, satin, cream, 8-10mm, 8-inch sections (1 pkg/10) F14-2710BS
1 box Seed bead, Dynamite, size 11/0, silver-lined rainbow purple (1 box/40
grams) F14-4543SB
1 box Seed bead, Dynamite, size 11/0, silver-lined rainbow silver (1 box/40
grams) F14-4531SB
1 box Seed bead, Matsuno, size 8/0, rainbow transparent, cream soda (1
box/40 grams) F14-8220SB
2 beads Seed bead, Matsuno, size 8/0, silver-lined pink (1 box/ grams)
F14-4957SB
2 beads Bead, sterling silver, 24mm ribbed cone F14-1055MB
1 clasp Clasp, sterling silver, 22mm leaf-shaped toggle F14-2975FD
2 pkg Eyepin, sterling silver, 4-inch (1 pkg/10) F14-5509FN
2 pkg Bead, sterling silver, 7.5x3mm beaded rondelle (1 pkg/1 troy ounce)
F14-7019MB
1 spool Beading thread, ‘Nymo’, nylon, size D, white (1pkg/2
bobbins) F14-1250BS
1 pkg Beading needles, #10, 1-1/4 inches in length (1 pkg/25) F14-1023BS
1 pair Scissors, 4-inch
1 pair Nippers, 5-1/8-inch
1 pair Pliers, short round nose
1 pair Pliers, short chain nose
Available at your local craft store:
1 pkg Quilter’s masking tape, ¼ inch
Instructions:
Step 1: Cut a long length of beading thread – I recommend working with two yards but you might find that is not a comfortable length for you, so try starting with 1 yard if that feels better. Thread the needle, leaving a tail so you are beading with a single thread.
Step 2: Using ¼ inch quilter’s masking tape, tape both ends of the satin cord at the edge of the satin cover, leaving the cotton filling exposed.
Step 3: Attach the thread to the cord by running the needle through the cotton filling and out through the satin, below the tape. Make a small stitch in the satin to secure.
Step 4: String beads onto the thread. Wrap the beads around the cord to determine how many you need to fit all the way around; making sure you have an odd amount. I use 21 beads for the 8-10mm cord.
Step 5: To secure the beads, run the needle and thread through all the beads one more time.
Step 6: Secure the bead strand to the cord by passing the needle through the cord from one side to the other, coming out below the strand of beads. Run the needle back through the cord starting above the strand of beads and coming out the other side of the cord, below the strand of beads. This will form a loop around the strand of beads and secure it to the cord.
You want the strand to fit right below the tape.
Repeat stitching around the bead strand, stitching on opposite sides of the last pass, so you have stitches on 4 ‘sides’ of the strand. Come back out at the beginning, where you started, and pass the needle out of one seed bead in the strand.
You are now ready to start the netting stitch.
Step 7: String two purple beads, two silver beads, one size 8/0 bead (cream soda), two silver beads and two purple beads onto your needle.
This will be the pattern you’ll use for the rest of the bracelet.
Skip two beads in the base strand then pass the needle through the third bead in the strand. As you pull the thread tight you’ll form a loop. Add another set of beads to the thread and skip two beads on the base row. Pass the needle through the sixth bead, pull up the loop. Repeat this step around the cord.
When you reach the last loop, skip two beads in the base and pass the needle through the first bead you exited in the beginning. Continue through the first four seed beads of the first loop, and the large bead (cream soda) at the bottom. Remember to do this each time you finish adding a row of loops which will set you up for attaching the loops to the cord.
Step 8: To attach the loops to the cord, make sure that the loop your needle is exiting is lying flat and not twisted. Make a small stitch in the satin, going from the side of the bead your thread is coming out of to the other side of the bead. You will be making the stitch backward. Pass your needle back through the large bead; you will now be headed in the correct direction. As you tighten the thread, there will be a loop around the large bead securing it to the cord.
Step 9: Make a small stitch in the satin between this loop and the next;
making sure the next loop is lying flat and not twisted. Run the needle
through the large bead and take a small stitch in the satin. Repeat this
step all the way around the cord, securing each loop as you go.
When you reach the last loop, take a small stitch in the satin and go
through the first large bead that you secured. This will be where
you begin the next row of loops and each subsequent loop will be built
off the large bead in each loop.
Repeat this pattern all the way around the strand.
Step 10: Repeat Steps 7-9 for the length of the bracelet, except for the last row.
For the last row, create the loops as before, but replace the large bead in the loop pattern with a purple bead. And remember, when you attach the loops to the cord, you will be using the purple size 11/0 bead.
Step 11: After you have attached the last row of loops, go back and add two purple beads between each of the purple beads you attached to the cord. This will finish this end and make it look just like the beginning. Weave the needle and thread through the cord a few times to secure the thread end. Clip the thread.
Step 12:Trim both ends of the cord almost to the tape. This will keep the cotton fiber from showing and make it easier to attach the cones.
Step 13: Using the round nose pliers, roll the eye of one eyepin a few times to make a thicker, wider end. This ensures that the eyepin will not slip through the large hole of the cone. Add one size 8/0 seed bead to the eyepin and insert it into the cone. Add one silver rondelle. Begin a wrapped loop at the end that extends past the cone, securing the clasp in the loop before wrapping closed.
For instructions on how to make a wrapped loop, visit www.firemountaingems.com/beading_howtos.
Wrap from the loop down to the silver rondelle, making sure to wrap until the rondelle and cone are tight and sturdy. Trim excess wire, and make sure the end is flush with the wrap.
Step 14: Add glue to the end of the cord, on the tape and the fiber of the cord, and insert the end into the cone. Make sure that you have the cone against the seed bead strand.
Allow the glue to dry, then repeat Steps 13 and 14 for the other end
of the bracelet.
| Project Images | |
 |
|