
606-3
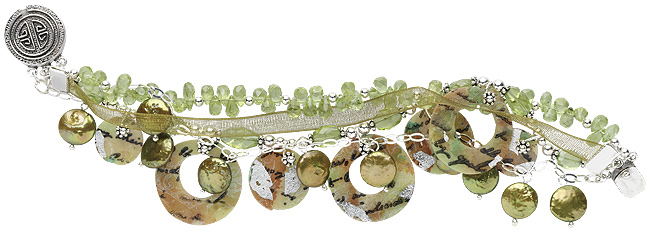
Peridot and Polymer Multi-Strand Bracelet
Designed by Tamara L. Honaman
Material needed
30 inches Beading wire, .014, 7x7, clear (1 pkg/30 feet) F14-1541BS
6 beads Crimp bead, sterling silver, 2x1mm cut tube, heavy walls (1 pkg/10)
F14-9678FD
26 beads Bead, sterling silver, 3mm seamless (1 pkg/100) F14-6585MB
17 beads Bead, sterling silver, 4mm seamless round (1 pkg/100) F14-1656MB
23 beads Bead, sterling silver, 4x1mm rondelle spacer (1 pkg/1 troy ounce)
F14-7024MB
7 pieces Headpin, sterling silver, 2-inch with 2mm ball end, .027mm (1
pkg/100) F14-4478FD
10 pieces Headpin, sterling silver, 1-1/2-inch with 1mm ball end, .5mm
(1 pkg/8) F14-4065FD
7-1/2 inches Chain, sterling silver, 3mm oval link (1 pkg/25 feet) F14-1654CH
4 pieces Jumpring, sterling silver, 5mm round, 20.5 gauge (1 pkg/50) F14-1996FD
2 pieces Crimp-end, silver-plated, for ribbon, 10x5mm smooth finish (1
pkg/10) F14-4511FD
1 clasp Clasp, sterling silver, 17mm round, 3 strand F14-6150FN
1 strand Bead, peridot (natural), 8x6mm faceted oval (1/16-inch strand)
F14-7869GS
1 strand Bead, peridot (natural), approx. 8x4mm faceted briolette (1/16-inch
strand) F14- 4432GS
10 pearls Pearl, cultured freshwater (dyed), green-gold, 10mm coin (1/16-inch
strand) F14-1537PL
10 inches Ribbon, organza, olive, 6mm, ¼-inch (1 pkg/ 33 yards)
F14-2371BS
1 pkg Kato Polyclay™, translucent (1 pkg/3 ounces) F14-2607BS
1 pkg Mica pigment kit, primary elements, four summer colors, (1 pkg/1
kit) F14-2781BS
1 sheet Silver leaf, aluminum, 5-1/2-inch square sheets (1 pkg/25 sheets)
F14-2624BS
1 bottle Designa Seal, gold leaf top-coat sealant, clear (1 pkg/ 3.5 ounce
bottle) F14-3239TL
1 Poly-roller™ Machine, steel F14-3264TL
1 pair Wire cutters, Acculon nipper, 5-1/8-inch
1 pair Pliers, round-nose, OHM short ergo, 5-inch
2 pair Pliers, chain-nose, OHM short ergo, 5-3/4-inch
Available at local craft or hardware stores:
2 Rubber stamps
1 Black rubber stamp pad
1 White rubber stamp pad
1 Circle template with various size circles
1 Fine knitting needle or beading awl (sharp pointed tool to cut along
the inside edge of the template)
1 paintbrush
Assorted alcohol inks
Alcohol blending solution
Alcohol ink applicator
Alcohol ink felt pads
Hairdryer (optional)
Baking sheet
Parchment paper
Plain paper
Convection or toaster oven dedicated to craft use
Oven thermometer
Any tool, work surface, baking surface, or cutters, must remain polymer
clay tools and should not be used in the kitchen.
Clay Preparation:
Kato Polyclay needs to be conditioned before using it in your designs.
For instructions on how to condition clay visit: http://www.firemountaingems.com/beading_howtos/beading_projects.asp?docid=690C&sact=search.
For additional tips and tricks for working with Kato Polyclay visit:
http://www.firemountaingems.com/beading_information/beading_resources.asp?docid=POLYMERCLAY&sact=search.
Instructions:
Step 1: Roll the translucent clay through the Poly-roller, starting at the thickest setting and working down to the next-to-last thinnest setting. Lay the sheet onto your work surface.
Step 2: Open one bottle of alcohol ink and place a few drops onto the felt pad on the applicator. Repeat, adding many colors, in any design.
Step 3: Dab the inked felt onto the sheet of clay in a random fashion; repeating until you’ve covered the sheet of clay to your liking.
Step 4: Add a few drops of alcohol blending solution to the areas on the clay you’ve applied inks; this creates a watercolor-like effect. Set the hairdryer on a low setting and point it toward the clay to help the ink dry. Please note: if you have the hairdryer set too high you will blow the blending solution into different patterns and could begin to cure the clay. You can allow the inks to dry on their own.
Step 5: Ink a rubber stamp with black ink. Press the image onto the surface of the clay sheet. Use a hairdryer on a low setting to dry ink or allow to air dry.
Step 6: Ink a different rubber stamp with white ink. Press the image onto the surface of the clay sheet. Use a hairdryer on a low setting to dry ink or allow to air dry.
Step 7: Open the book of silver leaf. Carefully tear off small pieces of leaf and apply to the sheet of clay in a random pattern.
Step 8: Choose a circle on the circle template that you’d like to be the size of the pendant for your bracelet. Lay the template over the area of the clay you’d like to cut out. Using a fine knitting needle or craft knife, cut around the inside of the circle. Place a hole at the top of the circle, about 2-3mm from the edge. Repeat to cut out multiple circles, varying the size if you’d like.
Step 9: Place a small circle from the circle template over a larger circle cut out in Step 8. Use the fine knitting needle to cut out the small circle, creating a donut-like pendant and a smaller circle pendant. Place a hole in the smaller circle. Repeat to create as many donut-like pendants as you’d like.
Step 10: Preheat your convection or toaster oven to 265°F. Place a piece of parchment paper onto your baking sheet. Place the pendants onto the parchment paper. Place the baking sheet into the oven and bake for 20 minutes. Keep an eye on the temperature as you don’t want it to fluctuate; too hot you’ll burn the pendants; too cool the pendants won’t cure properly.
Step 11: Once fully baked, remove the baking sheet from the oven; set it onto a heatproof surface. Place a sheet of plain paper on top of the pendants and place the heavy book on top of the paper; the book will help keep the pendants from warping as they cool.
Step 12: Once cool, use the paintbrush to apply a thin coat of DesignaSeal to the surface of the pendants. DesignaSeal will not only enhance the colors from the inks and stamp pads, it will also leave a shiny surface and protect the silver leaf from tarnishing. Allow to dry thoroughly. If you like the look of the finish, skip to the next step. If you’d like a little more shine, or the first layer didn’t cover properly, paint on another thin layer of DesignaSeal.
Step 13: Once the DesignaSeal has dried completely, thread a sterling silver rondelle spacer onto a headpin with 2mm ball, and then thread a pendant onto the headpin, face down. Place the tip of the round-nose pliers behind the pendant and bend the headpin up to a 90° angle. Place the round-nose pliers, with the wider part of the barrels, about ½-inches above the bend. Bend the wire around the barrel of the pliers to form a nice smooth loop or hook. Tip the headpin so the spacer and the pendant fall toward the bend; hold the loop with the chain-nose pliers then wrap the longer part of the headpin around the tip of the headpin, in front of the sterling silver rondelle spacer. Make a simple loop and trim any excess wire. This will create a bail for the polymer pendants to hang from later. Repeat for all pendants.
Step 14: Separate the clasp halves. Thread a 3mm sterling silver round bead, a crimp bead and one 3mm sterling silver round bead onto the beading wire. Thread on a group of three briolettes, one 3mm sterling silver round bead, then five briolettes. Continue stringing a 3mm sterling silver round bead between alternating groups of three and five briolettes until you reach your desired bracelet length, keeping in mind the length the clasp will add to the finished size. Finish the strand with a 3mm sterling silver round bead, a crimp bead and one 3mm sterling silver round bead. Pass the beading wire through the loop on one half of the clasp then back through the 3mm sterling silver round bead and the crimp bead; cinch up the beads and the beading wire so there is very little wire showing between the loop on the clasp and the 3mm sterling silver round bead. Using chain-nose pliers, compress the crimp bead so the beading wire is secured to the clasp. Trim any excess wire.
Step 15: Tighten up the beads on the strand and cut the beading wire from the spool leaving a 2-inch tail. Pass the beading wire through the loop on the other half of the clasp, back through the 3mm sterling silver round bead and the crimp bead. Tighten the beads so there’s little wire showing between the loop on the clasp and the 3mm sterling silver round bead, little wire showing between the beads in the strand, but not so tight the strand is taught; you should be able to flex the wire and see that it has a nice drape. Compress the crimp bead with the chain-nose pliers. Trim any excess wire.
Step 16: Thread one 3mm sterling silver round bead, one crimp bead and one 3mm sterling silver round bead. **Continue stringing one sterling silver rondelle, one faceted peridot oval, one sterling silver rondelle, one 4mm sterling silver round, one 3mm sterling silver round, one polymer pendant, one 3mm sterling silver round, one 4mm sterling silver round, one sterling silver rondelle, one faceted peridot oval, one sterling silver rondelle, one 4mm sterling silver round, one polymer pendant, one 4mm sterling silver round.***
Repeat from ** to *** two more times. Continue stringing one sterling silver rondelle, one faceted peridot oval, one sterling silver rondelle, one 4mm sterling silver round, one 3mm sterling silver round, one polymer pendant, one 3mm sterling silver round, one 4mm sterling silver round, one sterling silver rondelle, one faceted peridot oval, one sterling silver rondelle, one crimp bead, one 3mm sterling silver round bead. Please note – you may need to adjust your pattern to match the length of your first strand – you want your strands to work well together, not have one hanging much lower than the other – adjust where you’d like to add or subtract beads.
Pass the beading wire through the center loop of the clasp then back through the 3mm sterling silver bead and the crimp bead. Compress the crimp bead with chain-nose pliers to secure the beading wire to the clasp.
Step 17: Tighten the beads on the strand and cut the beading wire from the spool leaving a 2-inch tail. Pass the beading wire through the center loop on the clasp, back through the 3mm sterling silver round bead and the crimp bead. Tighten the beads so there’s little wire showing between the loop on the clasp and the 3mm sterling silver round bead, little wire showing between the beads in the strand, but not so tight the strand is taught; you should be able to flex the wire and see that it has a nice drape. Compress the crimp bead with the chain-nose pliers. Trim any excess wire.
Step 18: Insert the end of the organza ribbon into one ribbon crimp-end. Compress the end, capturing the ribbon. Measure the ribbon so it’s an appropriate length for the existing strands and trim. Add the second ribbon crimp-end.
Using two chain-nose pliers, open one jumpring. Slip on the loop of one ribbon crimp-end and the center loop of the clasp; close the jumpring. Repeat on the other ribbon crimp-end.
Step 19: Thread a coin pearl onto a headpin with 1mm ball. Make a simple
loop above the pearl. To learn how to make a simple loop visit: http://www.firemountaingems.com/beading_howtos/beading_projects.asp?docid=652S&sact=search
Repeat to make 10 pearl drops.
Step 20: Cut the oval link chain to an appropriate length, so it drapes well with the other strands. Open the loop on one pearl drop and slip it onto the second link on the chain. Place the other nine drops onto the chain, leaving four links of chain between each drop. You can make more or less pearl drops for the length of chain.
Step 21: Using two chain-nose pliers, open one jumpring. Slip on the
first link of chain and the last loop on the clasp; close the jumpring.
Repeat for the other end of the chain.
| Project Images | |
 |
|