608-1
Art Clay Multi-Strand Necklace
Designed by Tamara L. Honaman
Material needed
1 pkg Art Clay® Silver 650, low fire, slow dry formula (1 pkg/50
grams) F14-2628BS
29-inches Chain, sterling silver, 5.7mm heavy cable (1pk/5 feet) F14-1056CH
28-inches Chain, sterling silver, 3.6mm flat cable (1pkg/5 feet) F14-1162CH
22 pcs Headpin, sterling silver, 2mm ball (1 pkg/10) F14-4457FD
15 beads Bead, sterling silver, 3mm seamless-look round (1 pkg/100) F14-1655MB
12-inches Wire, sterling silver, half-hard, round 20-gauge (1 pkgl/5 feet)
F14-1170WR
3 ¼-inches Sterling silver, half-hard round 14-gauge wire (1 spool/5’)
F14-1299WR
20 pcs Jumprings, sterling silver, 7.3mm round, 18-gauge (1pkg/20) F14-2040FD
3 beads Bead, Swarovski® crystal, amethyst AB, 4mm cube (1 pkg/12)
F14-3870CY
15 beads Bead, Swarovski® crystal, light amethyst, 6mm cube (1 pkg/6)
F14-3963CY
2 beads Bead, Swarovski® crystal, vitrail, 6mm medium round (1 pkg/12)
F14-2857CY
2 beads Bead, Swarovski® crystal, tanzanite, 6mm round (1 pkg/12)
F14-1581CY
1 pkg Acrylic rod
2 sheets Non-stick sheets, 4-inch work-surface (1 pkg/1) F14-3083TL
1 pkg Craft knife set, three handles, 13 blades (1 pkg/1 set) F14-1578TL
1 pkg Scissors, 4-inch (1 pkg/1) F14-3050TL
1 pkg Texture plate, 5x4in, set of 8 different patterns (1 pkg/ set of
8) F14-3071TL
1 pkg Paragon kiln, model SC-2, 1200W-120V F14-3066TL
OR (Micro torch, butane, black, 6x4 inches) (F14-3047TL)
1 pkg Fiber Blanket , 5x6x1in (1 pkg/1) F14-3074TL
1 pkg Wire brush, fine steel, 8-1/4 x 5/8in (1 pkg/1) F14-3073TL
1 pkg Agate burnisher, 8-inch (1 pkg/1) F14-3069TL
1 pkg Rubber block , black, 2x2in (1 pkg/1) F14-3082TL
1 pkg Needle files, 5-3/4in round, set of 12 (1 pkg/set of 12) F14-2022TL
1 pair Wire cutter, 5-1/8in (1 pkg/1)
1 pair Pliers, short round-nose ergo, 5-inch (1 pkg/1)
2 pair Pliers, short chain-nose ergo, 5-3/4 inches (1 pkg/1)
1 pkg Wenol, metal polish, 3.9-ounce tube (1 pkg/1 tube) F14-2219BS
Available at craft, hardware or grocery stores:
1 Cocktail straw or fine knitting needle
1 sheet Cardstock or manila folder
1 Pencil
2 stacks Cards, three-cards high, taped together
2 stacks Cards, two-cards high, taped together
1 Plastic circle template with multiple size circles
1 Soft paintbrush
1 Tbl. Olive oil
1 Salon board (from health & beauty stores) med/fine-grit
1 Work surface – I like to put a piece of white paper under
an 8x11 piece of acrylic or plexiglass purchased from a home-improvement
center
Instructions: Creating the silver elements
Step 1: On a sheet of cardstock, draw a curvy shape, about 2-1/2-inches tall and 1-1/2-inches at the widest point. Cut out the shape which will be used as a template for the pendant; set aside.
Step 2: Set up your work area and gather all supplies so they are close at hand (once you open the clay, it begins to dry so you want to optimize the working-time). To prevent the clay from sticking to your tools and hands, lightly oil your work surface, the acrylic rod, a texture plate, the plastic template and your hands. Remove one lump of clay from packaging; compress the clay in your fingers for about 30 seconds.
Step 3: Place the lump of clay onto the oiled area of your work surface. Place a stack of cards on either side of the clay (the cards will maintain an even thickness in the clay as you roll it out). Using the acrylic rod, roll across the surface of the clay. Lift the clay off of the work surface, flip it around and over, then place it back onto the work surface and roll the rod across the surface of the clay again. Continue rotating the clay and rolling it out until the thickness of the clay equals that of the stack of cards or cardstock.
Step 4: Place the 2-card stacks on opposite sides of the oiled texture sheet. Place the rolled out clay onto the texture sheet, between the card stacks. Roll across the surface of the clay, pressing it against the texture sheet. Carefully remove the textured clay from the texture sheet and place the clay, texture side up, onto a non-stick square.
Step 5: Place the curvy template (made in Step 1) onto the surface of the clay. Using a craft knife, carefully cut along the template. Remove the template and carefully remove the excess clay from around the cut-out design. Using a fine knitting needle, start a hole near the top of the shape, which will be used to suspend your pendant later and place a hole near the bottom, which will be used to join two curvy shapes together – do not put these holes too close to the edges – when the clay is fired, it will shrink and make the holes even closer to the edge, which could lead to a weak connection. Carefully set the non-stick surface aside, with the clay still in place, so the clay can dry thoroughly.
Step 6: Repeat steps 3-4. Flip the curvy template over (so it mirrors the one you cut out in step 5) and place it onto the surface of the textured clay. Using a craft knife carefully cut along the template. Remove the template and carefully remove the excess clay from around the cut out design. Using a fine knitting needle, start a hole near the top of the shape and at the bottom, mirroring the holes made in the first curvy piece. Carefully set the non-stick surface aside, with the clay still in place, so the clay can dry thoroughly.
Step 7: Repeat Steps 3-4. Place the oiled circle template onto the surface of the clay. Using a craft knife, carefully cut along the template. Remove the template and carefully remove the excess clay from around the cut out design. Using a fine knitting needle, start a hole near the top of the shape, which will be used to suspend your pendant later – do not put this hole to close to the edge – when the clay is fired, it will shrink and make the hole even closer to the edge which will lead to a weak connection. Carefully set the non-stick surface aside, with the clay still in place, so the clay can dry thoroughly.
Step 8: Repeat step 7 to create multiple circle cutouts, varying the size so you have a nice assortment.
Step 9: Choose one of the larger circles cut out in step 8. Position a smaller circle from the circle template on top, off center. Cut out the smaller circle. Place a hole in the smaller circle cut out and set both circles aside to dry. Repeat to make several.
Step 10: Select two circles with cutouts made in step 9 that match in size. In addition to the hole made at the top, make 3 holes along the opposite side; the three holes will be used as a multi-strand connector to attach multiple layers of chains later.
Step 11: Once all of the cutouts have dried thoroughly, they need to be refined. Gently rub a salon board along all the outside edges until they are smooth and no rough edges remain. Use the needle files to refine the holes and openings. Dust off all loose particles using a soft paintbrush – if you leave any particles they will fire in place.
Step 12: Fire the pieces.
Firing with a kiln:
Place the dried, refined pieces onto a kiln shelf. Place the kiln shelf
into the kiln; fire at 1472°F for 20 minutes. Let the kiln return
to room temperature.
Firing with a torch:
Clear your work area of any combustible material. Place a dried, refined
piece onto a fire brick. Dim the lights if possible. Ignite the torch,
hold at a 45° angle, about 2 inches above the piece, and begin to
heat the piece, working in a circular motion so you heat the piece evenly.
As the piece heats up, the binder will begin to burn off; you will see
a small flame and smoke which will fade quickly. Continue to heat the
piece until it changes to a salmon color. Hold the entire piece at this
color for at least two minutes; if you start to see the piece turn shiny
(indicating the metal is melting), pull the torch back but continue to
heat the piece, holding it at the salmon color. Let piece cool to room
temperature.
Step 13: Once pieces are cooled to room temperature, the surface needs
to be burnished. Place one piece onto a rubber block (used to lift the
piece off of your work surface) and begin to brush across the surface
with the fine steel wire brush; continue brushing until you’ve brushed
the entire surface, revealing a bright and shiny silver.
You can further burnish the silver pieces with an agate burnisher followed by Wenol® silver polish – the brightness of the finish is up to you.
Creating the finished elements
Step 14: Cut two 1-inch sections of 20-gauge wire. Place one end of the
wire into the round-nose pliers, about ¼ inch down the barrels,
and so no wire is peaking out. Rotate your wrist away from your body to
form a small loop. Repeat on the other end of the wire so the loops face
opposite directions, like an “S.”
Repeat to create eight small S links.
Step 15: You can use a purchased clasp or make an S-hook clasp yourself. To make your ownc clasp: cut a 3 ¼-inch length of 14-gauge wire; blunt cut both ends. Hammer ¼ inch on each end to flatten the wire slightly. Grasp one end of the wire in the round-nose pliers, about ¼ inch down the barrels. Rotate your wrist away from you to form a small loop. Repeat on the other end of the wire so the small loops face in opposite directions.
Place the wire into the round-nose pliers, so one small loop is resting on top of one barrel and is facing toward you, positioned at the widest part of the barrels. Rotate your wrist away from you to form a large loop; the wire should look like a shepherd’s hook. Repeat on the other half of the wire so the shape resembles and “S.” This “S” will work as your clasp.
Step 16: Cut a 5-inch length of 3mm chain.
Step 17: Thread a 6x6mm Swarovski® light amethyst cube and a sterling silver 3mm bead onto a headpin. Begin a wrapped loop. Before completing the wrap, slip the loop onto the second link of the 5-inch length of chain; complete the wrap. Repeat adding Swarovski® light amethyst cubes down the length of chain in a random pattern.
For instructions on how to make a wrapped loop, visit www.firemountaingems.com/beading_howtos.
Step 18: Using two chain-nose pliers, open a jumpring. Place a silver circle onto the open jumpring then thread the jumpring through a link in the 5-inch length chain; close the jumpring. Repeat adding circles down the length of chain in a random pattern. Set aside.
Step 19: Cut 1 inch of 3mm chain. Place a Swarovski® 4x4mm amethyst AB cube onto a headpin. Begin a wrapped loop; before closing, add the loop to the last link on one end of the 1-inch length of chain; complete the wrap. Repeat adding a Swarovski® 4x4mm amethyst AB cube to the second link and the third link. Repeat adding a Swarovski® 6mm vitrail medium round crystal to the first and fourth links. Repeat adding a Swarovski® 6mm tanzanite to the second and third links. Repeat adding a Swarovski® 6x6mm light amethyst cube to the last link of the chain so it rest below the other crystals.
Step 20: Cut 14-inches of the 5.7mm chain. Using two chain-nose pliers, open one jumpring. Slip on the holes in the top of the curvy shapes, the last link in the 1-inch length of chain (so the crystals hang through the opening the two curvy halves create) and the center link of the 14-inch length of 5.7mm chain; close the jumpring.
Step 21: Open a jumpring and slip through the holes in the bottom of the curvy shapes; close the jumpring.
Assembling the components
Step 22: Cut two 7 ½-inch lengths of 5.7mm link chain.
Step 23: Open one loop on a small S hook made in Step 15, opening the loop up – not out to the side, and slip on the last link on one end of one length of chain. Open the other loop on the same small S hook and slip on the top loop of one circle made in Step 10. Repeat, using the other small S hook, the other length of chain and the other circle made in Step 10.
Slip the last link on the other end of one length of chain onto one half of the large S-clasp made in step 16; repeat for the other length of chain.
Step 24: Open one loop on a small S link, pass the open loop through the last link on one end of the 5-inches length of chain from step 18; close the loop. Open the loop on the other end of the S link and pass it through the top of the three holes on the circle attached to the chain assembly created in Step 23.
Repeat to attach the 5-inch length of chain to the other circle in the chain assembly.
Step 25: Open one loop on a small S link, pass the open loop through the center hole of one circle in the chain assembly; close the loop. Open the other loop in the S link, add the last link of the remaining 22-inch section of 3mm chain; close the loop.
Repeat, attaching the chain to the other circle in the chain assembly.
Step 26: Open one loop on a small S link, pass the open loop through the lowest hole on one circle in the chain assembly; close the loop. Open the other loop in the S link, add the last link on one end of the length of chain that has the curvy pendant attached; close the loop. Repeat to attach the chain to the other circle in the chain assembly.
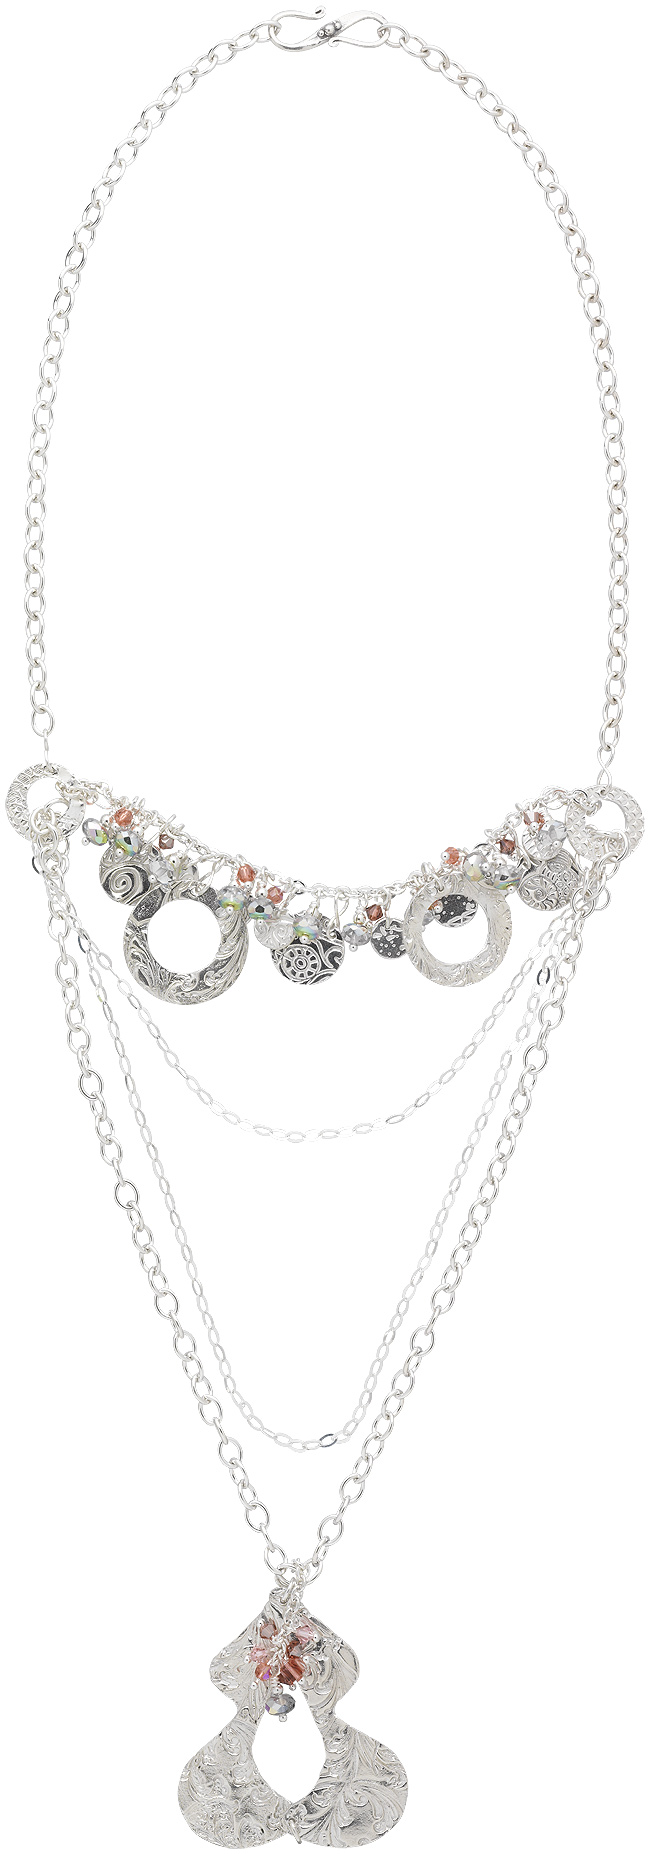
| Project Images | |
 |
|