
612-1
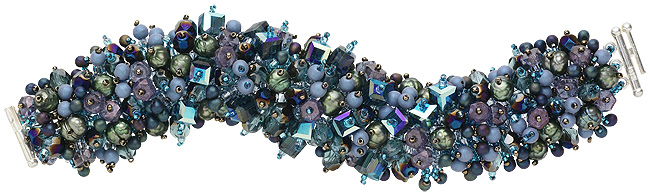
Lush Embellished Bracelet
Designed by Sherry Serafini
Material needed
1 needle Beading needle, size 11 (1 pkg/25) F14-1024BS
1 bobbin Beading thread, Nymo, size D, black (1 pkg/2 bobbins) F14-1251BS
1 pkg Seed bead, size 8/0, silver-lined light blue (1 pkg/35 grams) F14-4966SB
1 pkg Seed bead, Rocailles, size 15/0, transparent silver-lined blue (1
pkg/250 grams) F14-2351SB
1 pkg Seed beads, Rocailles, size 15/0, metallic dark gold (1 pkg/35 grams)
F14-2424SB
1 pkg Seed bead, Dyna-mites, size 11/0, aqua, silver-lined rainbow (1
pkg/40 grams) F14-4522SB
1 strand Bead, Czech fire-polished, lilac luster, 6x3mm rondelle (16-inch
strand) F14-1048GL
1 strand Bead, Czech pressed glass druk, blue satin, 4mm round (16-inch
strand) F14-1149MD
1 pkg Bead, Swarovski® crystal component, Montana AB, 6mm cube (1
pkg/48) F14-2125CY
1 strand Bead, Czech fire-polished, blue/teal, 6mm faceted round (16-inch
strand) F14-1242GL
1 strand Pearl, cultured freshwater, green 5-6mm faceted potato (16-inch
strand) F14-1407PL
1 clasp Clasp, sterling silver, double slide lock with three loops F14-5892FN
Tools
1 pair Scissors
Instructions:
Creating a Square-Stitch Base
Step 1: Measure your wrist and decide how long to make your bracelet,
be sure to take into consideration that the clasp will add one inch to
the beaded section.
Step 2: Thread a needle with two yards of thread.
Step 3: String a stop bead (see instructions for ‘Adding a stop bead’ below) onto the end of the thread, leaving an 8-inch tail, to be woven into the beadwork later.
Step 4: To work the square stitch, string on six size 8/0 seed beads. This is the first row and should be on the left.
Step 5: Pick up a bead on the right side for the second row, and go back through the last bead in the previous row then pass the needle up through the new bead again.
Step 6: Each bead is added the same way. Pick up a bead, pass the needle back through the bead directly next to it and through the new bead again.
Step 7: Each time a row is finished, pass the needle through the entire previous row once more, and then up through the just-finished row to add strength.
Step 8: Continue working square stitches until you’ve reached the
desired length of your bracelet, remembering to leave one inch for the
clasp.
Remove the stop bead.
Adding the Clasp
Step 9: Thread a needle with approximately 18 inches of doubled thread
and weave into the last two rows of one end of the beaded square stitch.
Step 10: Tie off a knot between the rows and bring your needle in between the first and second size 8/0 seed bead at the end of the strip.
Step 11: Pick up a size 8/0 seed bead, five size 15/0 seed beads and pass your needle through an end hole on one half of the clasp. Pick up five more size 15/0 seed beads. Pass the needle back down through the size 8/0 seed bead.
Step 12: Pass the needle through the next two size 8/0 seed beads in the end row and bring it up in between those rows. Pick up a size 8/0 seed bead, five size 15/0 seed beads and pass your needle through the middle hole on one half of the clasp. Pick up five more size 15/0 seed beads. Pass the needle back down through the size 8/0 seed bead.
Step 13: Pass the needle through the next two size 8/0 seed beads in the end row and bring it up in between those rows. Pick up a size 8/0 seed bead, five size 15/0 seed beads and pass your needle through the remaining hole on the clasp. Pick up five more size 15/0 seed beads. Pass the needle back down through the size 8/0 seed bead. Weave the needle and thread through the square stitch tying off several knots to secure.
Step 14: Repeat this step for the other side of the clasp.
Adding Embellishments
There are several embellishment stitches that will be used randomly to
create this bracelet.
Step 15: Thread a needle with approximately two yards of thread, doubled.
Step 16: Weave the needle and thread through the square stitch at one of the ends and tie off a secure knot.
Step 17: Starting in the first row, pass the needle through a bead on the edge.
Stop Stitch:
Step 18. Pick up a size 6mm satin blue bead and a size 15/0 dark gold
bead. Skip the dark gold size 15/0 and pass the needle back through the
6mm bead and into the edge bead on the square stitch.
Loop Stitch:
Step 19: Pass the needle through the size 8/0 in the square stitch base
directly beside the one exited. Pick up five size 15/0 blue beads, pearl,
five more size 15/0 beads and pass through the bead directly beside the
one just exited creating a loop.
Bead Stack:
Step 20: To create a stack, pick up three size 11/0 aqua seed beads, a
Swarovski cube and a size 15/0 dark gold seed bead. Skip over the size
15/0 bead and pass the needle down through the Swarovski cube and through
the three size 11/0 beads. Pass the needle into the size 8/0 directly
beside the one exited.
Step 21: Repeat Steps 18-20 throughout the entire first row alternating stop stitches, loop stitches and beaded stacks with different beads from the pallet chosen.
Step 22: Weave the entire piece.
Tip:When your threads become short, weave them into the square stitch and tie off and knot in between beads. Begin a new thread the same way the first one was started.
Step 23: Finish the piece by weaving the needle and thread into the beadwork, tie off the knots and clip.
Adding a stop bead: Stop beads are used to help hold
the beadwork in place while you weave or create your deign, but are not
meant to be part of the overall finished design. I recommend choosing
a bead that is very different from the beads in the finished piece to
help differentiate the stop bead from the beads in the design.
String a bead onto the thread. Bring the bead down to the end of the thread
(or leave a tail length as indicated in the directions for the project
you’re working on). Pass the needle through the stop bead again
– it will not be set in place, temporarily with a loop around it.
Begin your project.
Remove the stop bead once the design is complete or the directions for
the project indicate.
| Project Images | |
 |
|