713-6
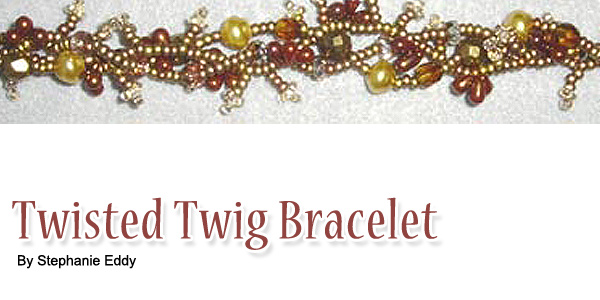
Twisted Twig Bracelet
By Stephanie Eddy
Sponsor: Shipwreck Beads
Material needed
Size size 8 seed beads (2 colors B and C)
4mm drops
10mm glass pearls
6 mm crystals
10 mm crystals
4mm disc
Size B Nymo and #12 needle.
Instructions:
1. Measure your wrist and add 1/4-inch..Cut 2 1/2 yards of thread. The
entire bracelet will be completed on one length of thread.
2. BEGIN by adding one C (size 8) as a STOP BEAD.
Leave a 4-inch tail.
3. Row 1 (stem): add enough S (size 8) beads to equal
the length of your wrist plus 1/4-inch. Add another C— This will
be known as the END BEAD. Add 5 S beads, a shank button,
and 5 S. Go back through the END BEAD forming a loop. Go through 3 S on
the stem.
4. TWIG & BLOSSOM: * Add 5 S (for twig) and 3 B (for
blossom). Go back through the 3 S only. Go through the next 3 S on the
stem.* Repeat * making one more TWIG & BLOSSOM.
5. BUD: add three 4mm drops. Go back through the opposite
side of the S so that the drops sit on top. Go through 3 more S on the
stem.
6. Continue across the stem alternating 2 TWIG & BLOSSOM, 1 BUD. Work
the pattern as close to the STOP BEAD as possible. Go through the STOP
BEAD.
7. Add approximately 24 S or enough to form a loop that is large enough
to go over the button. Go back through the STOP BEAD.
Check to make sure the closure loop goes over the button before continuing.
8. Row 2: **add 5 S. Add one 6mm, three S, one 8mm, three
S, one glass pearl. Repeat this pattern across to equal the length of
the wrist measurement. Go through the END BEAD and around through the
beads that form the loop coming back out the END BEAD. Continue back across
Row 2 to reinforce. Go through the STOP BEAD, around the loop and back
out the STOP BEAD.
9. Row 3: Add 7 S. Pattern: add one 4mm, five S. Repeat
across. Go through end bead around the loop and back out end bead. Reinforce
back across the row. Go through stop bead, around the loop and through
stop bead.
10. Finish: when complete the thread should meet the
tail. Tie both threads together twice with an overhand knot. With the
needle, work both ends of the thread back into one of the stems two inches
or more.
11. Twist: to braid lay the bracelet on a flat surface
and start braiding in the center. As you weave the braid will work itself
out to both ends. Keep the braid in place by holding 2 stands in your
left hand and 1 strand in your right. Bring the button end of the bracelet
through the center. It doesn't matter if you bring if through the front
or through the back.
Design, Graphics and Copyright Instructions by Stephanie Eddy
©2007
Stephanie Eddy
| Project Images | |
 |
|